|
|
|
Checking and Changing Engine Oil
CHECK YOUR OIL LEVEL FREQUENTLY!
At Least Every Other Gas Fill Up.
~~~
Checking the Oil
Note: Volkswagen engines are designed to use a little oil when running, so checking the level often is very important.
- Run the engine until hot, then turn it off.
- Wait for at least five minutes after the engine is turned off before checking the oil. This will allow most of the oil to drain down to the crankcase.
- Pull out the dipstick and wipe it clean with a rag.
CAUTION: The dipstick may be hot.
- Reinsert the dipstick and make sure it is seated all the way in.
- Remove the dipstick again and look at the level of the oil on it. There are two scored marks on the dipstick; the level of the oil should be between them.
- If the level of oil is less than half way between the two marks, add a little oil to bring the level up. We recommend using Castrol GTX 20W50 oil. Be careful not to spill any oil; wipe up any spills.
Note: The oil filler spout is located directly under and a little to the right of the alternator; an integral part of the alternator stand. Be sure to replace the cap.
- If the level of the oil is below the lower mark on the dipstick, add an entire quart of oil to bring the level up. But do not overfill!
Note: If you check the oil every other gas fill-up, this low oil condition should never occur. If it does, there is a serious leak from the crankcase or the engine is burning oil (blue smoke). Either of these conditions should be remedied as soon as possible.
- Replace the dipstick and the oil filler cap if it was removed. Replace the cap on the container of oil and stow it in the trunk for future use.
~~~
Changing the Oil
Frequent oil changes are the best preventive maintenance you can give your VW engine, because aging oil becomes diluted and contaminated, leading to premature engine wear. Also, the VW engine runs hotter than a water cooled engine, and so it gives the oil a harder workout. VW recommends oil changes at least every 3,000 miles, and more frequently in very cold climates. Since good quality clean oil is the life-blood of your engine, this is excellent advice.
Note: If you are also going to adjust the valves, do that first. Valve adjustment must be done with the engine cold; the oil is changed hot, as the warm oil and sludge will flow out more easily.
- Make sure you have all the necessary tools before starting. You will need:
- Drain pan.
- Plenty of rags.
- 3/8"-drive ratchet and appropriate sockets.
- 1/4"-drive ratchet and 10mm socket.
- Newspapers.
- A large coffee can for cleaning parts in.
- A container for the waste oil.
- Start the car and drive it around the block a few times to warm it up.
- Park the car on a level spot, preferably in the garage. Block the front wheels and raise the rear of the car, but don't tilt the car too much, otherwise you won't get all the old oil to drain out. Just high enough so you can get under there to reach things. Support the car on jack stands.
- The first step to an oil change is draining the old oil. So, crawl under your car and see what you have. Look at the bottom of the engine case, right in the center, and you will see a round metal plate. This is the oil sump plate. It is held to the engine case with a number of very small nuts. Your car may or may not have a large bolt in the middle of the plate. If it does, you're lucky -- the large plug in the middle of the sump plate makes it easier to drain the oil. If your sump plate does not have a drain plug in the center, you can buy one for just a few bucks.
Note: Our '73 Super Beetle did not originally have a drain plug. After a little research we learned that from 1973 onwards, VW left the drain plug out to make sure that the sump plate and screen were removed for cleaning with each oil change. If you do not have the center drain plug, be prepared to get your forearm doused with warm, dirty oil! Screen covers with drain plugs in them are cheap, and hopefully you're smart enough to remember to remove the sump plate and screen each time for cleaning.
- Being careful not to touch the hot exhaust components, place the drain pan under the bottom of the sump.
- If you have the center drain plug, unscrew it and let the warm oil drain into the pan. If you don't have the center drain plug, loosen (but do not remove) the small nuts around the perimeter of the sump plate. You'll get to a point where you've got most of the nuts off and oil has started to drain from around the sump plate. At this point, you might as well let the oil drain rather than covering yourself with oil trying to completely remove the nuts.
- Once the oil has completely drained (just a drip or two now and then), remove the nuts around the perimeter of the oil screen sump plate.
- Remove the sump plate and screen and place all of the removed parts in a can for cleaning.
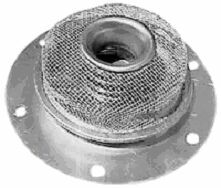
Oil Filter Screen
~~~
Note: Once you have the sump plate off, the oil screen will probably fall out into your oil pan. If not, sometimes it hangs up a bit on the sump plate mounting studs, so reach up in there and carefully pull the oil screen out. This screen is your engine's only method of filtering oil, so you must either clean the screen or buy a new one (we've never bought a new one). Remember -- the car has no oil filter -- the screen is it. Clean or replace it every time.
Use an appropriate solvent to clean the parts -- gasoline works, but if you use it be extremely careful. Gasoline is VERY volatile and VERY flammable! See our Safety Warnings regarding gasoline. Gasoline is also a good solvent for natural skin oils, so skin contact with it can cause dryness/rashes/dermatitis. Mineral spirits is a better choice for a cleaning solvent.
- Clean any oil sludge off of the sump plate.
- Make sure that none of the old gasket remains stuck to the sealing surfaces. Remove with a scraper if necessary. Clean up the sealing surfaces on the bottom of the engine case with a rag. Clean the sealing surfaces thoroughly to assure the new gaskets will keep your oil in where it belongs. (See our article on Oil Leakage from the Sump Plate.)
- Now you're ready to put it back together. Hold the oil screen up like it goes into the engine, then put one gasket over it on the engine side, to match up with the holes. Shove the whole works up into the engine where it goes, then put the other gasket on. Then put the sump plate up there and start the nuts (with new crush washers on each one) and the center drain plug (where applicable).
Note: DON'T use gasket-goo or other sealants on the sump plate, or you will have difficulty with the next oil-change removal.
- Tighten the nuts around the perimeter of the sump plate in the following sequence: #1, then #2 directly opposite, #3 next to #1, #4 directly opposite, etc.
Note: DO NOT OVER TIGHTEN THE SUMP PLATE NUTS! The proper torque for these nuts is very low, like 5 ft-lbs. A "snug-and-a-tug" with a 1/4-inch ratchet is sufficient. If you tighten them any more, you're likely to either strip the stud or pull it out of the case. So be gentle.
- After you tighten the nuts, then tighten the center drain plug; make that one fairly tight.
- Now, crawl out from under the car and open up the oil fill cap adjacent to the generator/alternator. Put in 2.5 liters of new oil. Use a spout or funnel if necessary to prevent oil from spilling onto the top of the engine.
Note: We recommend the use of conventional Castrol GTX 20W50 oil for most of the warmer climates and 10W-40 for the cooler areas. John Henry (The Bug Shop) and others have provided informative raps on oil.
- Remove all tools and other stuff from under the car and then carefully lower it to the floor.
- Wait a few minutes to allow the oil to drain into the sump, then check the level on the oil dipstick. Add oil as necessary to bring the level to near the top mark. Again, do not overfill.
- Install the filler cap hand tight.
- Start the engine and check to make sure the oil pressure light goes out after the engine has started. Allow the new oil to circulate.
- While the engine is running, look under the car and check for leaks around the cover plate. Tighten the nuts if necessary (but not too tight -- oil will actually leak more if the nuts are too tight).
- Turn off the engine and wait a few minutes to allow the oil to trickle down to the sump. Recheck the level on the dipstick and add oil if necessary.
- If you have an oil bath air cleaner, now is the time to deal with that as well. The oil in it has to be changed regularly and when better to do it than your oil change? So, remove the air cleaner from the engine (usually a screw-clamp or two) and open it up. Pour the old oil into your oil drain pan and wipe the air cleaner out. Then put new fresh oil in up to the fill line in the air cleaner.
Note: This only applies if you have an oil bath air cleaner, of course. If you open your air cleaner and find a paper filter element, DO NOT under any circumstances add oil!
- Using a funnel, transfer the old gucky oil to a convenient container and take it to the nearest recycling center.
*
* * * *
|
|
