The Windshield Washer System
~~~
The following topics are discussed in this article -
~~~
System Description -- Standard Bugs
In the Standard Bug (e.g., 1970 model) the windshield washer reservoir is a cylindrical white plastic 1-liter tank which sits behind the upright spare tire. The original hose is very flexible thick rubber hose, since it's under pressure. 42psi is the recommended pressure for a full bottle -- this much will just about empty the bottle, although the last quarter is really a dribble. Plain plastic tubing would probably not cope. There is a button in the middle of the wiper switch which opens a valve in the rubber line, releasing wiper fluid.
~~~
Dave's Dilemma
Dave wrote, early in the windshield washer restoration process -
The windshield washer system was missing in our car when we purchased it. Whoever decided to 'customize' the car by removing all the chrome and painting everything black also pulled the windshield washer system out, plugged the hole for the spray nozzle, and painted over it. They even tore out the bracket in the luggage compartment for the washer container! (These folks went to great lengths to ruin this poor little Bug!)
Id like to restore the washer system, but theres not much in the books about it and I really dont know where to start. I believe the washer fluid reservoir is pressurized from the spare tire. There are remnants of a hanger in the luggage compartment, on the right side. I assume the bracket was initially for the washer fluid container. I have purchased the washer system components -- the washer fluid container, hose and valve for the container, a hose to go in the switch, and the spray nozzle. But I am unclear regarding how the system goes together.
What Dave was most unclear about was how to get the tubing through the firewall and up to the switch on the steering column -- he had trouble locating the proper holes, which are most likely inside the fresh air box, he surmised. As is his usual MO, Dave asked a lot of questions and surfed the Internet for information and was finally successful in learning how the washer system is configured, and he was able to restore it.
~~~
System Description and Restoration -
Super Beetle
Note:This description is more detailed, as the article was written by Dave, documenting his experience with the washing system in his Super Beetle. Many thanks to Steve (sgriffis@adelphia.net) and Khalid (khalid.din@sleepcountry.ca), who provided much of the following information, and to Bob (ka1dza@adelphia.net), who provided parts!
The following describes the Super Beetle windshield washer system and documents what Dave did to restore it.
The Super Beetle Washer Reservoir
~~~
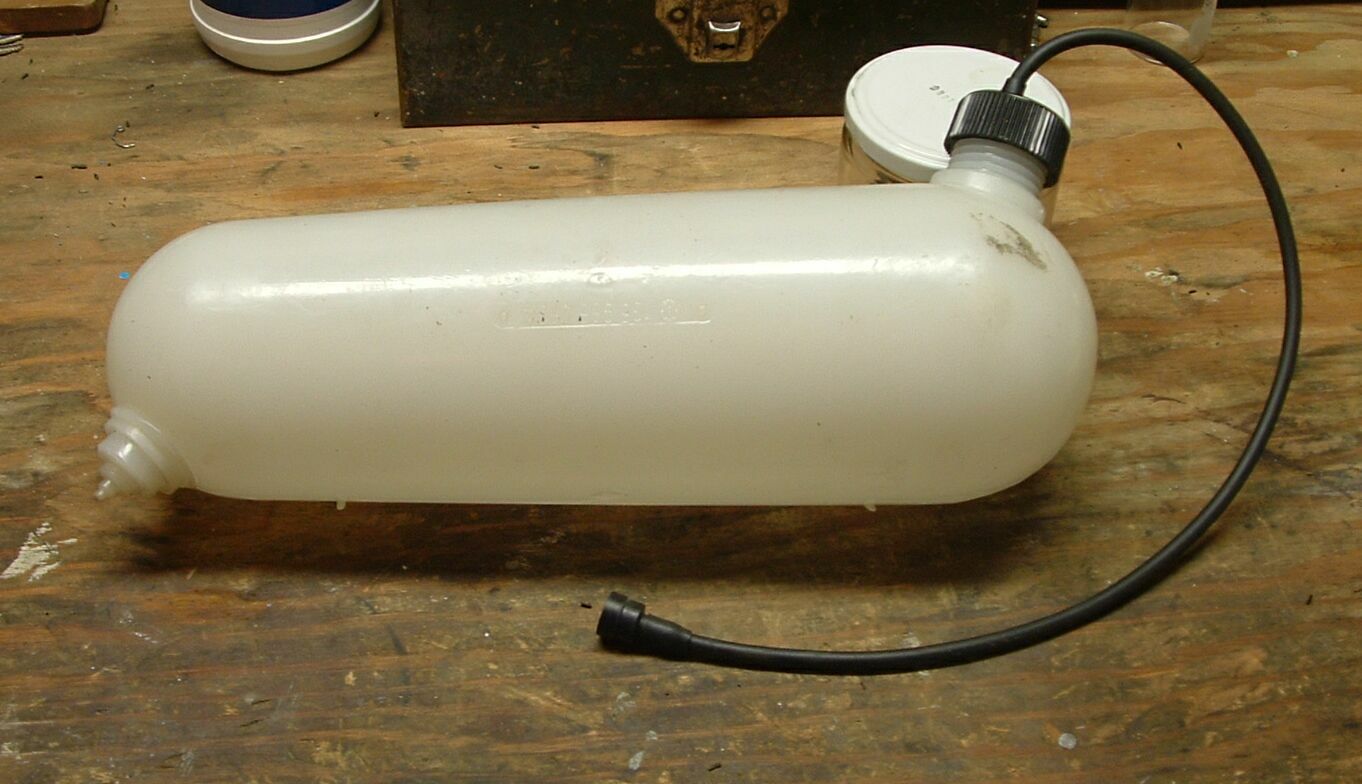
The washer fluid reservoir is located on the right (right) side of the luggage compartment, where it rests diagonally. The bottom, which has a fitting for the fluid leaving the reservoir, rests in a circular bracket on the inside of the fender. On the top there is a larger fitting that rests rather freely in a crescent-moon shaped bracket that is also attached to the inside of the fender.
The system receives its pressure from the spare tire. A rubber hose extends a short ways from the top of the washer reservoir; on the end of it is a female tire valve stem fitting. Just a few inches away in the washer bracket is a standard tire air fitting, to which the hose from the washer reservoir attaches. This fitting has a hose that extends down to the spare tire, where it attaches to the tire fitting by way of a female fitting.
The Owner's Manual for the '73 SB says that it is possible to fill the spare tire with air by way of the standard tire air fitting in the washer bracket.
Dave ran into a problem at this point - the washer 'kit' did not come with the piece that runs from the washer bracket down to the spare tire. Also, the washer reservoir that Dave purchased did not come with the bottom tubing connection. On the nozzle on the bottom of the reservoir has a very small nipple sticking down, with a larger female thread up closer to the tank. None of Dave's normal VW parts outlets carry the fitting for the outlet on the bottom of the washer reservoir. However, a friend in B.C. wrote to say that -
It's quite simple how it attaches. There is a screw fitting that fits over the threaded part and has a hole in the centre. Once you have the plastic screw cap that goes over the thread nipple on the reservoir the hose tightens up and will not come out. It automatically crimples the hose so the pressure from the tire will not push it off.
The friend thinks the fitting might be available at Bow-Wow Auto Parts. (?)
An e-mail friend in New Hampshire keyed Dave into a Bug shop in Florida -
Sun Ray Bugs
16016 Us Highway 301
Dade City, FL 33523
(352) 521-5660
Dave called Sun Ray Bugs and found some very friendly and helpful people. They had the fitting and sent it to Dave, free of charge! Many thanks to Sun Ray Bugs (I wish they had a Web site or an e-mail address, but they don't). Dave has yet to find the piece of hose that runs from the washer bracket down to the spare tire.
Back to the operation of the system - there is a one way/pressure limiter valve built into the fitting on the top of the washer reservoir -- this will allow the spare to only drop to about 26 psi and no further. The spare is always pumped to about 42 psi to allow for this.
When the washer switch on the steering column is activated by pulling the wiper handle toward you, washer fluid exits the bottom of the reservoir, then travels through a rubber hose to the left side of the luggage compartment, then through a hole in the firewall, and on into the cabin to the washer switch on the steering column.
There are two nozzles on the washer switch -- one for pressurized washer fluid in (the bottom one), and one for fluid out to the squirter (the top one). Note that these nozzles are quite long; you need to push the hoses onto them as far as possible to prevent them from coming off and squirting water all over the cabin floor! The hose from the upper nozzle on the steering column goes up through a hole in the firewall (with a grommet in it) about 2-3 inches to the right (right) of the steering column, into the fresh air box. The hose then goes on up to the squirter in the center of the body, aimed at the windshield. You can adjust the angle of the nozzles by inserting a straight pin (sewing pin) in the nozzle and moving it around.
The system is quite simple, though it does require water and electrics in close proximity under the steering column.
~~~
System Upgrade
An improvement on the VW windshield washer system would be to mount an electric pump (a 'generic' bottle and built-in pump - available at most of the VW parts suppliers), and fit a push-switch somewhere convenient. The electric washer bottles are usually square or rectangular, and the Standard Bug pressure bottles have the filler in the center of the bottle since they sit horizontal, where the one in the Super Beetle one is semi-upright.
Probably the simplest method of doing this upgrade would be to get any generic electric wiper bottle which you can fit into the front luggage area where you want it to reside, then connect it through a separate push-button or rocker switch. The installation wouldn't be difficult, apart from cleaning out the hole for the nozzles (only one hole in between the wiper arms I think (unlike the standard Bug, which has two nozzles).
Someone wrote - I'm looking forward to putting in a column mounted electric washer switch to replace the old let's-make-the-spare-tire-flat-while-we-drive-about-in-the-rain style washer system. I've already picked up an NOS Mexican electric washer reservoir and pump assembly, and have noted that the "mister valve assembly" or washer switch valve & nozzle assembly is a standard replacement part for the old aircooled Beetles. If one were to remove the assembly and install an electric momentary microswitch in its place, do you think that would do the trick to power up the electric reservoir pump and wash my windows with electric power? It would look OEM with no pushbutton on the dash or whatever and should be relatively safer than running water up into my steering column.
Speedy Jim responded - Yes, that's a good idea.
Here's a picture of the wiper switch assemply.
The Blk/Gry wire is live from the fuse, so only one more wire is needed. There should be vacant positions in the plug and
socket for another pin; otherwise, use some sort of wire splice.
Here are some switch ideas.
A couple of tips -
- Use only fingers to pry the horn pad off the wheel; tools will break it.
- With the pad removed, turn wheel straight ahead.
- Then use a 27mm socket (1 1/16") to loosen the nut.
- Don't completely remove the nut.
- Rock the wheel and pull hard to remove; the nut will save your teeth when the comes loose!
- Finish loosening the nut and remove the steering wheel.
*
* * * *
|
