|
||

|
|
Speaker Kick Panels"Tunes" in the car are important, but where to put the speakers? Most people install them in the doors, cutting a large hole in the door trim panels and running the speaker wires through the forward door post and into the door. Dave decided go the kick panel route for his speakers, mainly because he was loath to ruin the new door trim panels by putting the speakers in the doors. After a little research Dave ordered a pair of fiberglass speak-mounting kick panels from an outfit called Innovations in Fiberglass in Phoenix, Arizona. While researching the success of others with this question, Dave received a very informative and useful post regarding the installation of speaker kick panels from James W. Lindsay (Sharkey's Garage) in Vancouver, British Columbia. Following is his advice (with a few additions from Dave) -Fitting speakers in kick panels inside the cabin is far better, for a number of reasons:
Test fit the panels into the car first, making any necessary cuts to improve the fit. Next, cut the holes for your speaker(s). When properly installed the panels offer a maximum of 2" mounting depth -- make sure your speakers fall within this! Once you have the panels ready for carpet, you have two paths to choose from:
or The first method is usually the way most people go, but it can be very difficult to get good results (I'd recommend letting an auto upholsterer do it for you). Since the panels aren't flat, the carpet with punch up along one of the two raised creases in the panel. This will require making a careful cut along one of the creases and cutting out a narrow, triangular piece of carpeting, so that the two edges butt up against one another. This can be rather difficult to dod with the panels in the car, due to the limited space. I went with the second method -- bonding the carpeting to the panel and making the necessary relief cuts to get a nice fit while the whole thing was outside the car. I then test fitted the panels inside the car and cut away any excess carpet (I left about a 1" overhang where the panels stands vertically near the door pillar, and about 5-6" along the bottom where it follows the countours of the heater channels (and slips beneath the front passenger floor carpeting). Finally, before installing I had the top and vertical edges "serged". Serging is a process which binds the edge of carpeting with heavy thread so that it doesn't start to unravel -- the edge of your VW carpeting should have a heavy serged edging. Anyone that specializes in making custom home carpet mats should be able to do this for you. If you can't find someone to perform this task, an automotive upholsterer should be able to stitch a narrow band of cloth or vinyl around the edges instead. It is up to you as to what looks best, although it is a bit cleaner looking to match the serging on your current carpet panels. Mounting the kick panels was accomplished using a combination of screws and Automotive Goop(tm). One or two screws should be all that is necessary to secure the panels (note where the screw tips will end up before picking locations to drill!), and the glue can do the rest (I used long strips of wood to hold the panels in place while the glue dried, using the natural bow of the wood to apply pressure). Don't forget to run your speaker wiring first! - From Sharkey's Garage. Thanks, James! Dave pulled back the new carpet on either side of the footwell area in the cabin and installed the speaker panels against the body of the car. He found that they fit very nicely, with plenty of space behind the panel for the speaker and no reduction in room for the drivers/passengers feet. Once the panels were covered by the carpet they were indistinguisable from the natural contours of the body of the car.
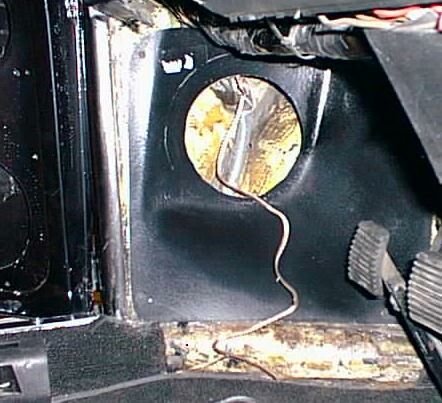 Speaker Panel Being Installed, |
||
|
|