|
|
|
Solving Overheating Problems
~~~
Subtopics related to overheating are as follows -
As we all know, the babies we all love so much are cooled by air.
Adequate cooling of the VW engine, and the flip-side, overheating,
are concerns.
In any system in which work is being done, the Second Law of Thermodynamics
dictates that some of the energy produced is wasted in the sense
that it cannot be utilized for work. This waste energy, in the form
of heat, must be transferred to a heat sink. In a water-cooled
car, the water circulating through the engine block and heads carries
the waste heat to a radiator, where the waste heat is dumped to
the atmosphere. The atmosphere is also the heat sink in the aircooled
VW engine, but in Volkswagens the waste heat is removed from the
engine by flowing air rather than water. Finning on the heads and
cylinders facilitates the heat removal, and a cooler is provided
in the system to remove heat from the engine oil; heat is also carried
from the oil cooler by flowing air.
We are often asked, What is the best way to keep my Bug cool?
And being the stock enthusiasts that we are, we respond, You already
have (or perhaps, had) everything you need. Volkswagen engineers
recognized from the outset the importance of keeping the engine
cool, and they came up with a very efficient design, consisting
of a blower (fan), a set of air vanes, thermostatically controlled
flaps, air dams and deflector plates. This system is designed to
efficiently direct the flow of cooling air toward the cylinders
and heads, paying particular attention to the exhaust valve areas
of the heads.
The smart VW owner will watch carefully for the tell-tale signs
of overheating. In his technical manual, Gene
Berg states that the safe upper oil temperature is on the order
of 235°F (113°C) so. If the temperature is higher than 235°F, the heat
can cause case studs to pull out, head and case sealing surfaces
to warp, cases to be internally distorted, permanent case metal
fatigue and engine bearings to wear prematurely. Sounds like a horror
story, but it is easily prevented if a few precautions are taken
and followed religiously.
~~~
Know If Your Engine Is Running Too Hot?
There are several of ways -
- The Poor Mans Dipstick Test -
With the engine completely warmed up, grab the dip stick and
pull it out. If you can JUST hold it without it burning your fingers,
the engine temperature is OK. If it burns your fingers (and the
engine will usually smell hot too), then the temperature is too
high -- possibly as high as 285°F (140°C) -- VERY hot!
- Install an Oil Temperature Gauge -
An oil temperature gauge requires an oil temperature sensor/
sender. There are two types of oil temperature sensors -
- Oil Sump Plate Sensor. This sensor will screw into the oil
drain plug hole, but the sensor extends upward enough that it
impinges on the oil screen assembly. The instructions that come
with this sensor say to drill another hole in the plate, to
one side of the plug, thread it, and install the sensor there.
- Oil Pressure Relief Plug Sensor. If your engine is equipped
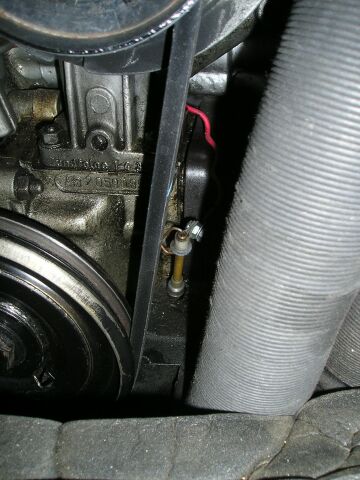
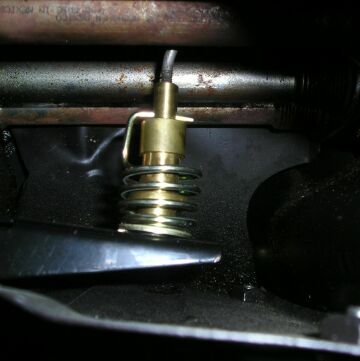
with a dual oil pressure relief system, you can install an oil temperature in the plug at the rear (pulley end) of the engine - the oil pressure relief valve (NOT in the oil pressure control valve at the front (flywheel end) of the engine). When installed as the plug in the oil pressure relief valve, the sensor will be picking up the oil directly from the sump so it will be measuring the temperature in the bulk of the oil - as it leaves the sump. Placing the temperature sensor at the flywheel end of the engine (oil pressure control valve) would mean the oil has picked up heat direct from the crankcase which might be higher than the sump temperature - less representative of the bulk of the oil. If your engine does not have a dual relief system, you will have to install the oil temperature sensor in a hole you drill and tap in the oil sump plate.
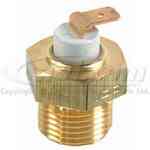
Oil Temperature
Sensor
Oil Temperature
Sensor Installed in the Oil Pressure Relief Valve
Note: This picture shows the oil temperature sensor correctly installed in the
oil pressure relief valve at the pulley end of the engine. Note the wire running forward
-- be sure to attach it securely with clips or cable ties so
that it doesnt interfere with the workings of the heater boxes,
etc.
~~~
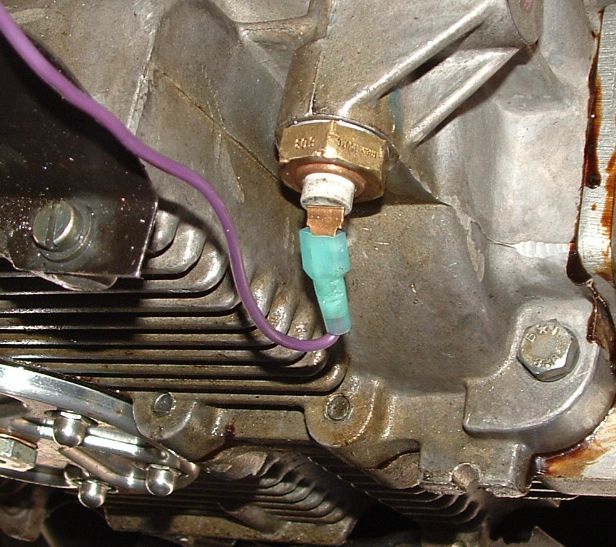
Wiring instructions come with the gauge (e.g., VDO). Generally
speaking, you run a wire from the sensor up to where you install
the gauge in the cabin. You will need to drill a small hole in
the floor pan behind the rear seat so you can route the wire into
the area under the rear seat, then forward from there). To wire
the gauge you simply connect the gauge to power (we used the #11
fuse) and to ground, and youre all set. In our Superbug we found
a nice place in the dash to install the gauge, just to the left
of the steering column.
Oil Temperature
Gauge.
We found the perfect location for our gauge in the dash panel
of our Super, immediately to the left of the steering column.
Access is a bit difficult unless you remove the steering wheel.
Using a right-angle attachment on the drill, we drilled a series
of holes around the circumference of the larger hole for the
gauge, then connected them with a coping saw blade. A bit tough
on the fingers!
~~~
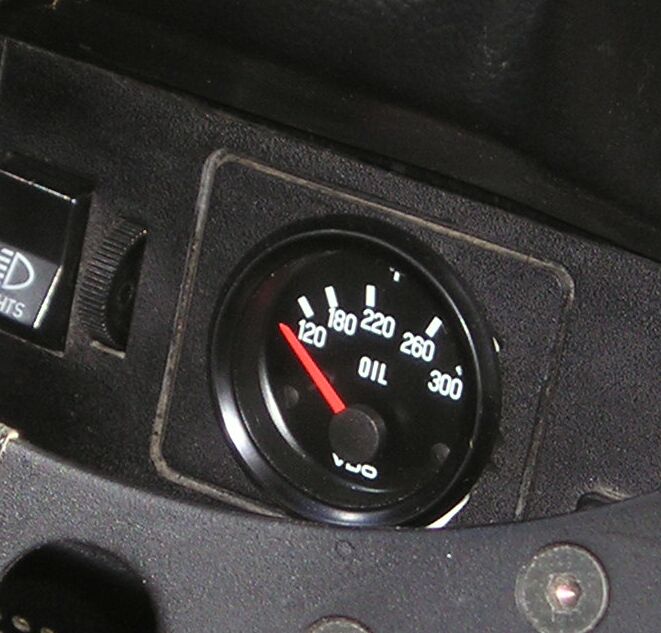
A word of caution from Gene Berg: Practically all (temperature
gauges) read low in the 212°F to 260°F (100°C to 127°C) degree range by 40°F to 50°F (4°C to 10°C) degrees
...
I found this to be true with the sensor installed in the oil pressure control valve at the front (flywheel end) of the engine. I inserted a candy thermometer with a 6-inch probe in the dipstick hole (calibrated at the boiling point of water - 212°F (100°C). Following a half hour run at full speed on the highway, ambient temperature 95°F (35°C), the gauge I installed in the dash read 182°F (83°C), while the candy thermometer in the dipstick hole read 220°F (104°C). However, with the sensor installed in the oil pressure relief valve plug at the pulley end of the engine, the temperature readings on the gauge in the dash and the candy thermometer in the dipstick hole were virtually the same.
Reading Temperature with a Candy Thermometer!
~~~
I was very disappointed - installing the oil temperature gauge was a lot of work. Much simplier is either the candy thermometer trick or Gene Berg's temperature-sensing dipstick, described below.
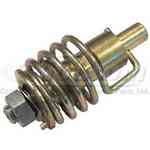
- Install a Temperature-Sensing Dipstick -
This sensor is sold by Gene
Berg Enterprises. It installs in the dipstick hole and connects
with a wire the oil pressure switch. When the temperature reaches
about 225°F (107°C), the spring inside of the dipstick turns to make electrical
contact, and the oil light in the instrument cluster begins to
flicker. As the temperature increases, the oil light will flicker
more rapidly until it remains on continuously -- which means your
oil temperature is dangerously high.
Temperature-Sensing
Dipstick.
This ingenious device was invented by Gene Berg and is
marketed by Gene
Berg Enterprises. The dipstick is
calibrated to signal a warning at 225F (107C).
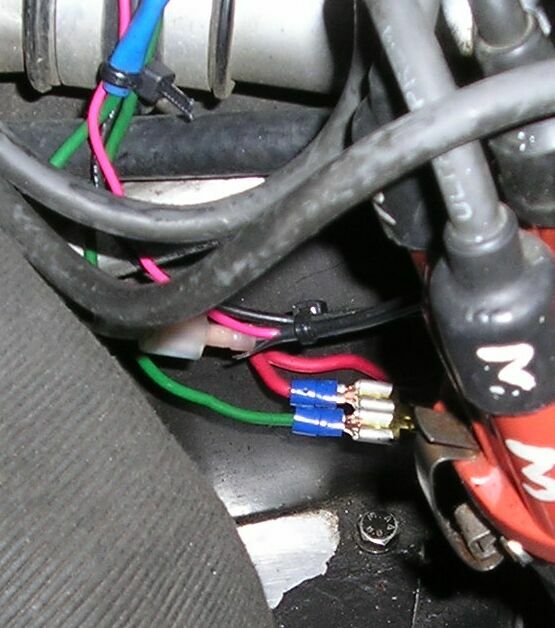
Connection to the
Oil Pressure Sensor.
The wire from the dipstick connects to the wire running up
to the oil pressure warning light in the instrument cluster.
Its easiest to make this connection right at the oil pressure
switch, using a three way connector as shown here.
~~~
With the temperature-sensing dipstick, you dont get any indication
that the temperature is rising until the oil light flickers, telling
you the oil is becoming too hot; but at least you can do something
before any damage occurs. The dipstick is very easy to install in
the car, since it uses the existing dash oil pressure light as an
indicator.
~~~
How Do You Keep the Operating Temperature
Within Safe Limits?
Below are some things that you can do (short of pulling the heads
and fussing with the compression ratio. Rob Boardman: Dropping
the compression ratio is counterproductive; more compression means
a more efficient engine.")
- Put a larger main jet in the carburetor. A larger main jet makes
for more evaporative cooling of the inlet, so the engine runs
cooler. This works for an engine which is running too lean (running
lean makes any engine run hotter), but it doesn't do as much good
for a car which has the right mixture already.
- Make sure that the air correction jet is the right size. A feature
of all open-throat type carburetors is that they tend to run over-rich
as the airflow increases through them. The air correction jet
is used to adjust this mixture. This jet adds air to the fuel
delivery nozzle, so larger numbers mean leaner at higher speeds.
With the stock Solex carburetors (or their modern Brosol and Bocar
replacements), the air correction jet is usually in the 110-130
size range. If it's up around 140-170 it's running the car lean
at higher speeds (it does very little at low speeds).
- Make sure the power jet (in the right side of the carburetor
near the idle jet) is the right size. From the 30PICT/2 carburetor
onwards (and the modern replacement Brosol and Bocar models),
a power jet was added which re-enrichens the mixture at full throttle
and high rpm, because the air correction jet works too well at
the carburetors maximum airflow. Without the power jet (or with
one which is too small), the engine will run lean at very high
rpm and high throttle, and as noted before, running lean makes
the engine run hot. The most common power jet size is 65. The
power jet feeds fuel, so larger means richer.
Note: The jets in Dave's Pierburg 34 PICT/3 carburetor are X130 main, 80Z air correction, and 55 idle.
- Make sure the cooling vanes and thermostat are working properly
and that the connecting rod is shaped properly to prevent binding
between the cylinder head fins. When you have the engine out,
make sure the flaps are opening easy and all the way -- you may
have to unscrew the push rod from the thermostat, but you should
then be able to push it up and down easy enough and check the
flaps.
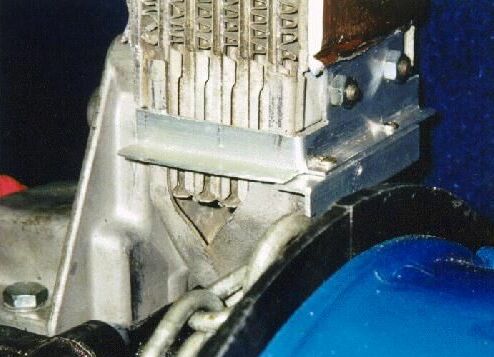
VERY IMPORTANT NOTE! Make ABSOLUTELY SURE the cooling vanes and thermostat are working properly! Dave learned this lesson in a very sad way. Shortly after building up a new long block and installing it in his Bug, Dave took the car for a long run up a very steep hill (Cabbage Hill, Oregon) on a very hot day. The result was a fried engine, caused by a malfunctioning thermostat. (Actually the thermostat worked just fine; the stud that holds the thermostat bracket to the engine block came loose, and the thermostat pushed the bracket down instead of pushing the connecting rod up, so the cooling vanes were locked closed.) A very costly oversight!
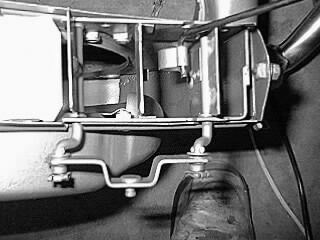
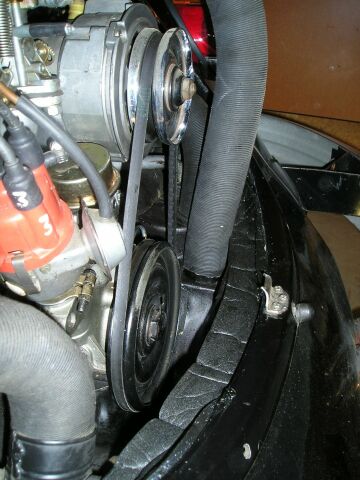
Cooling Vanes(3)
This picture is looking up into the fan shroud on either side,
where you can see the moveable cooling flaps. The connecting rod
is also visible; this rod is moved upward by the expanding thermostat
to gradually open the cooling flaps. Fully open, the flaps properly
direct the flow of cooling air over the engine cylinders and heads.
Please dont remove the cooling vanes and thermostat -- they provide
a very important function.
~~~
Old-Style Thermostat(3)
This is the stock bellows style thermostat, shown installed.
These are not longer made and are becoming increasingly rare.
~~~
The original style thermostat is no longer made and is becoming
more and more difficult to find. A very good option is to use the
new-style thermostat pictured below. This thermostat is the original
replacement style for Mexican fuel-injected Beetles made from 1975
to 1979 and is a suitable replacement for the old bellows-style
thermostat. The thermostat provides enough upward movement of the
connecting rod to fully open the flaps on both Type 1 and Type 4
applications.
Note: The fan associated with the "doghouse" oil cooler
provides plenty enough air to cool up to about 80hp (a warmed up
Type 4 engine in a Bug for example), but to get best effects you
have to ensure every bit of cooling air goes where it's most needed.
That means you must have the cooling flaps above the cylinders --
with these fully open more air is directed to the hotter heads and
less to the cooler cylinders. The cooling flaps also work with the
thermostat to provide a fast, even warm-up on those cold mornings.
The importance of cooling flaps used to be misunderstood and many
have been removed by engine builders as not needed, but they are
essential in getting more air where its needed most the cylinder
heads.
New-Style Thermostat
The Mexican-style thermostat, used in 74 - 79 Mexican Bugs.
New-Style Thermostat
Installed
Fortunately the Mexican-style thermostat perfectly
replaces the older bellows style and is very easy to install.
~~~
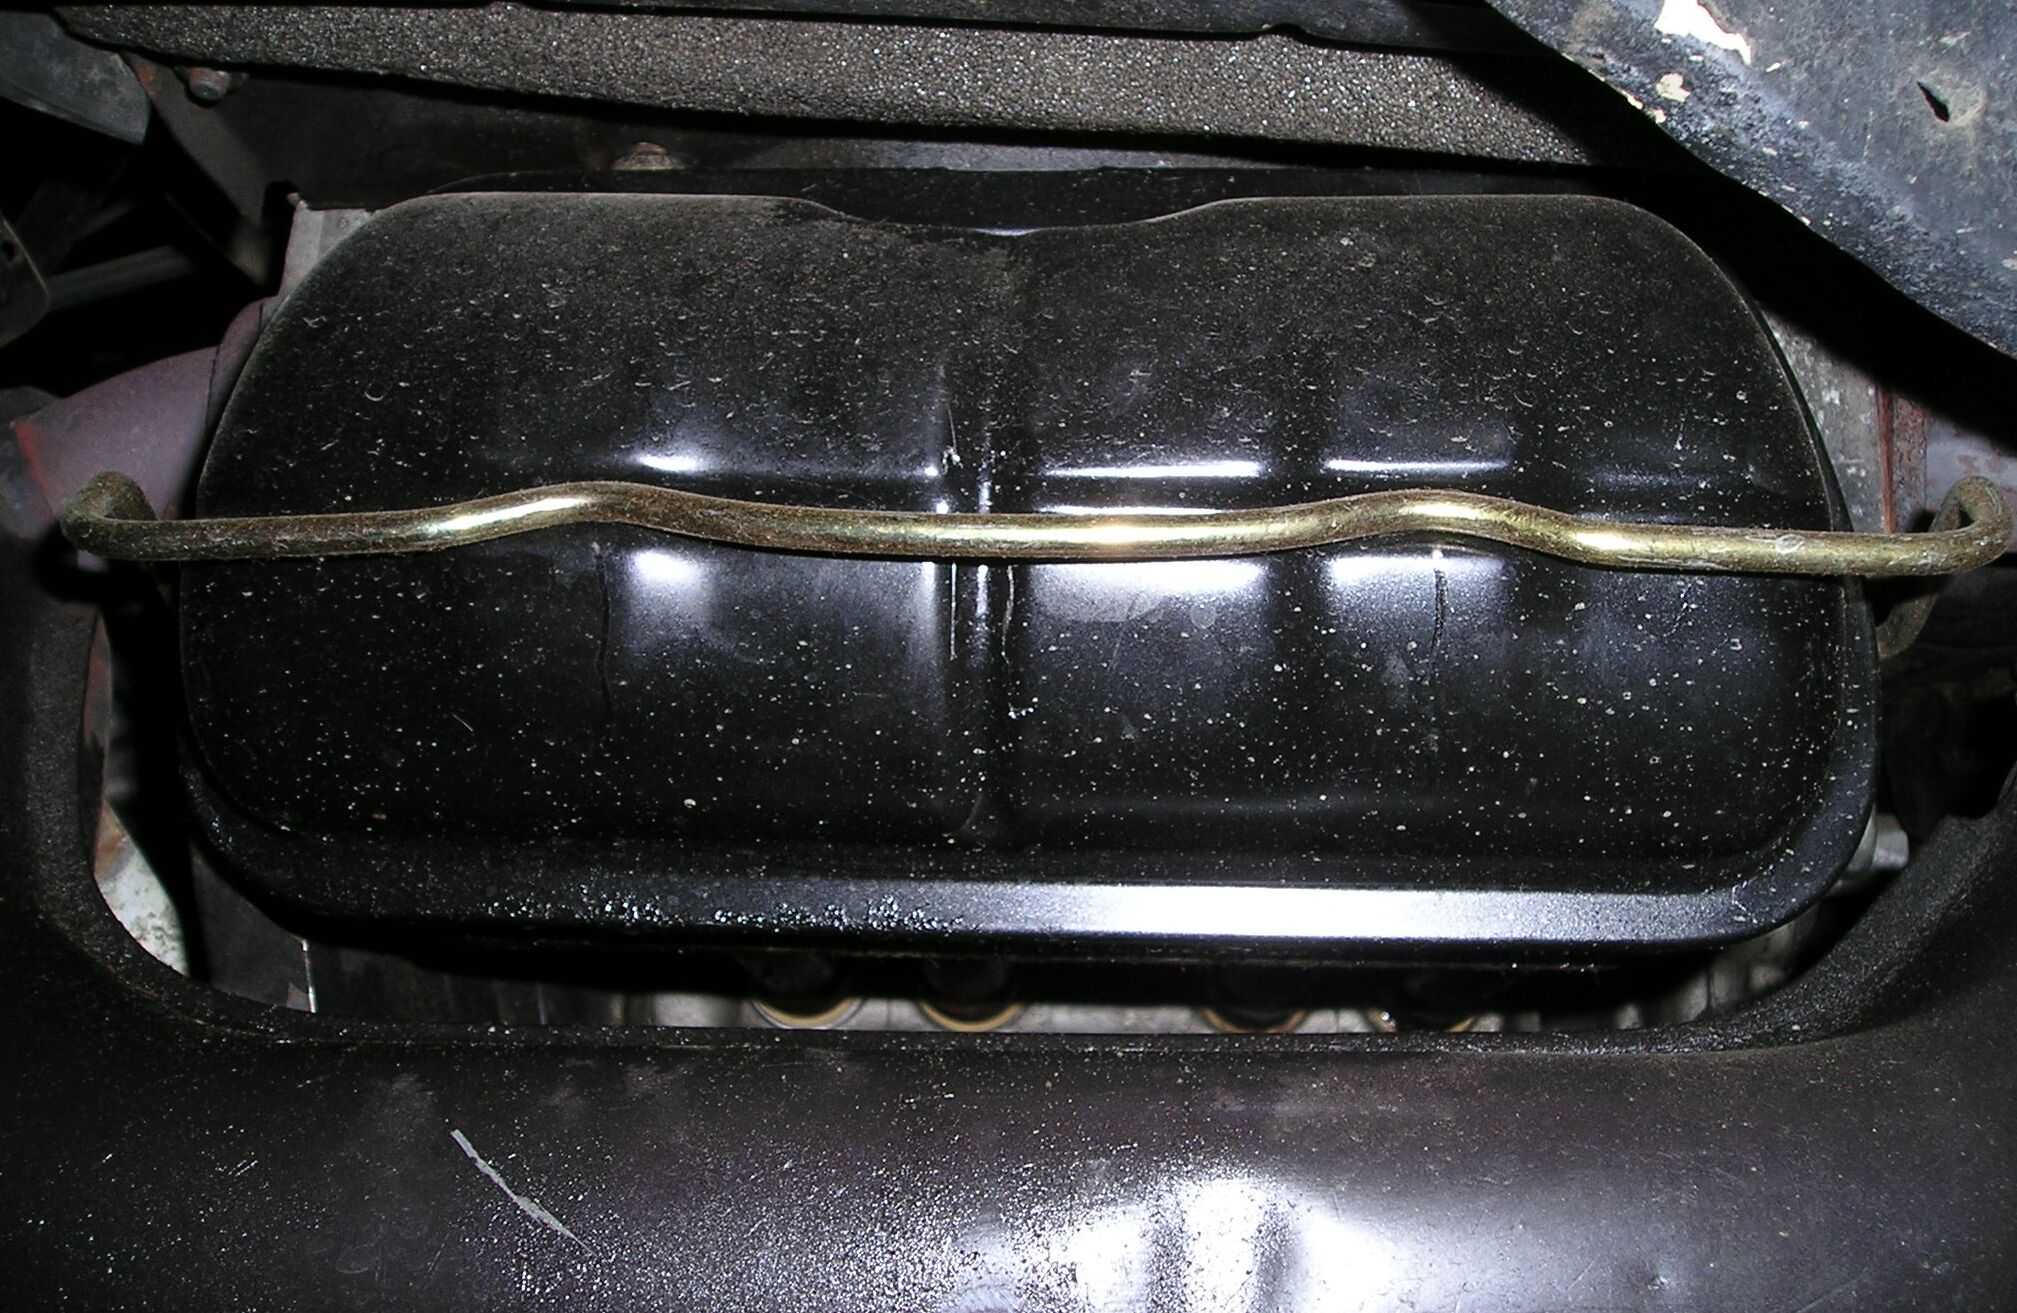
- Test the oil cooler and replace it if it is plugged. Make sure
the "Hoover bit" around the bottom of the oil cooler
is there. This is a roughly L-shaped bracket which seals off the
underside of the oil cooler on doghouse engines, preventing spillage
of cooling air back into the engine compartment. A lot of folks
don't realize just how important this piece is and remove it.
The Hoover Bit
This piece, which wraps around the bottom of the
oil cooler and prevents spillage of heated air back into
the fan, is often removed and discarded. The piece
must be left in place to assure that hot air is not
sucked back into the fan.
~~~
Note: Be careful not to over-torque the nuts on the oil
cooler studs you might squash the small rubber seals too much
and reduce the oil flow through them.
- Make sure the tin is properly fitted around the oil cooler to
assure heated air from the oil cooler is being dumped to the outside,
not back into the area in front (front means front of the car)
of the fan where it can be sucked back into the system.
Note: The doghouse tin fits inside the exhauster tin (i.e., the downspout that dumps hot air from the oil cooler out under the car). The fit is seldom perfect - we fixed this by wrapping some stout, heat-resistant tape (e.g., "Gorilla" tape) around the joint to keep hot air from being sucked back into the fan.
- Make sure the drive belt is properly adjusted, but not TOO tight
-- you don't want to ruin the alternator bearing. A half-inch
deflection in the center of the belt, when pressed with your thumb,
is about right. You'd normally start off a new belt with 3-4 shims
and work up to 5-6 shims as the belt wears. Replace the belt as
soon as it shows signs of wear cracks or fraying. Always carry
a spare fan belt without it your engine will fry in minutes.
- Use the stock black valve covers on the heads -- black covers
radiate heat better. We've heard it said that using the stock
black valve covers will reduce the oil temperature by as much
as 30F (17C). Fancy valve covers might look good, but the stock
ones are better for correct engine temperatures. (Years ago VW
used to supply an arctic kit for engines to be used under very
cold conditions. This kit included chrome valve covers to keep
heat IN the engine.)
Stock Black Valve
Cover
We removed our cool shiny aluminum valve
covers and went back to the stock black ones.
Weve noticed asignificant decrease in the
engine operating temperature as a result.
~~~
- Make sure all of the engine tin is fitted properly and all of
the seals are in place to assure that only fresh air is being
sucked into the engine compartment and thus into the fan - not
hot air from under the engine. This includes the seal around the
engine, the engine lid seal, the holes in the tin through which the spark plug wires pass, and any other holes in the tinware. Doing
this will reduce smell in the cabin when the heaters are on, too.
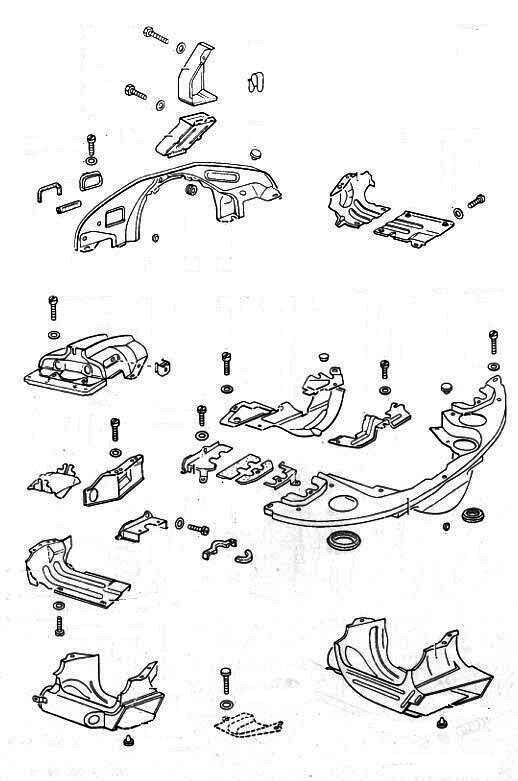
Engine Tin
This great exploded view of the engine tin, courtesy of
the Old Beetle Home, shows all of the tinware
pieces,each specifically design to maximize the flow
of cooling air. Please make sure they are intact!
New Engine Seal
An excellent replacement for the stock rubber seal,
especially if youre having trouble with the seal falling
down onto the muffler around the rear.
Sold by Aircooled.Net.
~~~
Note: Dave installed a fiberglass rear apron on his '73
Super Beetle. This apron does not have the slot for the stock rubber
engine compartment seal, so the stock seal would not stay in place
but kept falling down onto the muffler (or header as the case may
be). Dave discussed this situation with John Connolly of Aircooled.Net
and decided to go with an alternate seal that John recommended,
shown in the picture above. This seal is used in the 1972 and newer
Type 2's and the Type 4 VW. The seal is just pressed down into the
space between the engine tin and the body of the car, making it
much easier to install and much more effective in sealing this gap.
- Make sure the rubber air dams around the spark plug leads are
in place and properly fitted. Weve heard it reported that there
is a 25F (14C) rise in head temperature with these left off. They
harden with age and can then slide a little way up the plug lead,
resulting in a lot of leaking air. If they are not soft and flexible,
replace them.
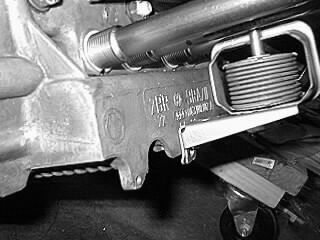
- Make sure the deflector plates under the cylinders are in place.
There is a small flat plate on each side, between and under the
cylinders, and an even smaller one under the center of each cylinder
head (on the right side the under-head deflector has a slot in
it for the thermostat pushrod). These are vital for good cooling.
They force the cooling air through the underside finning -- without
them the cooling air spills straight down and does not provide
much cooling for the underside of the heads or cylinders. Some
folks leave them off, not realizing how important they are.
- While you are under the engine, make sure the underside plenum
pieces of tinware are in place (a large curved piece of tinware
under the left side and two pieces on the right so the thermostat
can be easily changed). These turn the used cooling air backwards
to the rear of the car. If they are left off, the underside engine
finning is exposed to the turbulent high pressure air under the
car and poor cooling will result. On the stock engine the cabin
heat exchangers are used to dam off the outer sides of this plenum,
and if you have replaced the heat exchangers with J tubes you
still need to seal the outer edges of the plenum with some cut-to-measure
pieces of flat metal.
- "Cool tins" are used on Type 3 (pancake) engines to improve
underside cooling and can be fitted to the Beetle engine too.
They replace the cylinder deflector plates (the head deflectors
stay in place) and cup the underside of the cylinders so all the
cooling air is forced through the underside and out through the
exit holes in the tinware. They also have "ears" which cup the
outer corners of the head near the exhaust valves so that those
valves get a better flow of air through the fins there. They work
by actually reducing the cylinder air flow a little (but using
it better), and this results in a higher airflow through the heads,
so cooling is supposedly improved there too.
Note from a source we trust - Cool tins have been tested and it has been proven that they do not work well with the Type 1 fan and cooling components. It was more of a "hey we have a warehouse full of these, lets market them" gimmick than a real solution.
Cool Tin.
You shouldnt need the cool tin if all of the other
parts of your cooling system are in place and
functioning. But it is available at minimal cost
(e.g., from Aircooled.Net)and
is easy to install
(with the engine removed from the car).
~~~
You have to remove the engine to install the cool tin, and to fit
them to the Type 1 Beetle tinware they might need to do a little
cutting and bending. They are not really needed for a stock Beetle
engine, but if you have a higher performance engine or are experiencing
cooling problems, they might help. (We have not personally used
"cool tin" and cannot vouch for its effectiveness. It helps, though,
according to the experts.)
Overheating as Related to the 009 Distributor
Someone wrote -
I read on your site about VW's running hot.. What I miss in this
discussion is the distributor, which is often an 009 centrifugal-advance
distributor. Since the 009 will be over-advanced in certain conditions,
will this not be a key problem with overheating?
Rob responded -
The 009 distributor results in the engine running UNDER advanced
rather than over advanced, and in fact under-advance running will
cause an increase in engine temperature. The 009 distributor doesn't
begin to advance until about 1200 rpm while the vacuum distributors
will add about 8 degrees advance just as soon as you open the
throttle off idle - this helps the engine spin up smoothly. The
009 distributor must be limited to about 30 degrees maximum advance
because at that setting the engine will not detonate/ping if you
floor the throttle (think of it as a safety limit). But the vacuum
units can provide up to about 40-42 degrees advance under the
right conditions (for more engine efficiency and better economy),
and back-off that extra advance (back to around 30 degrees) if
you floor the throttle until the engine speed catches up to the
new throttle position - gradually re-introducing the final amount
of advance.
Summary of the Ways to Increase Cooling
(by Rob Boardman)
- Correct casting imperfections in the heads. If you look through
the finning on VW heads, you'll often find "dags" of metal between
the aluminum head finning which partially blocking the airways.
(This is not a problem with the cylinders - just occasionally
with the heads.) Removing these "dags" with a rat-tail file, a
chisel, a Dremel, etc. will smooth the air path through the head
fins, thus improving airflow and cooling of the heads.
- Use the standard VW pulley -- not a "power pulley." These spin
the fan slower and reduce cooling. A power pulley really isnt
worth it -- you gain about 1 hp at the wheels for the loss of
maybe 20% of your cooling air -- a BAD trade-off).
- Run higher octane gasoline. This will help if you have been
running a too-low octane fuel, but wont help if you already use
the correct octane. But dont think higher is better either.
A too-high octane number will not harm the engine in any way,
but wont help it run any better either. The stock 1200 and 1300
needs only 87 RON (84 AKI in the USA) and the stock 1500/1600
needs 91 RON (87 AKI in the USA). If your compression ratio is
higher than stock, then youll need fuel with a higher octane
number.
- Avoid oxygenates in the fuel. The most common oxygenates added
to gasoline are methyl-tertiary butyl ether (MTBE) (used extensively
the USA) and ethanol (when added to gasoline the mixture is sometimes
called gasohol). Because old VWs have no engine computer to
adjust the mixture on the run, oxygenates will cause the engine
to run leaner than it should, and lean means hot. If you cannot
avoid oxygenated fuel, increase the size of the main jet to return
the mixture to its proper balance. For example, fuel with 11%
MTBE (used in many parts of the USA) runs the engine 2% lean and
a main jet one size larger will fix this problem. Ten percent
ethanol in the fuel (called E10 in many countries) needs a main
jet two sizes larger to bring the mixture back into balance.
- Make sure the underside tinware is in place - both the flat
plate deflectors under the cylinders and the heads MUST be in
place or the airflow just spills straight down and the underside
cylinder/head finning doesn't see enough cooling air. Also make
sure the underside plenum tinware is in place - this turns the
used cooling air backwards out under the rear of the car. If it's
missing the cooling air meets turbulent high pressure air under
the car and this can reduce the engine cooling.
- Make sure all tinware holes between the upper and lower engine
areas are sealed, so there is no mixing of hot used cooling air
from underneath with the fresh cooling air above the engine. There
is also a very important piece of tinware under the oil cooler
- called the "Hoover bit" by a lot of VW enthusiasts - after Bob
Hoover in California (a VW Guru). It's roughly L shaped and it
is attached to the base of the oil cooler with one bolt and seals
the oil cooler so you don't get any spill of cooling air out the
bottom - it must then all pass through the oil cooler. Also check
the rubber air seals on the spark plug leads - these go brittle
with age and might get pushed up the leads and fail to seal off
the holes in the tinware where the plugs sit. Leaving these holes
exposed can increase head temperatures by up to about 25F.
- If cooling is still a problem with just the (well fitted) stock
cooling system, then fitting cool-tins might help. These were
originally designed for the type3 (pancake) engine with it's more
convoluted cooling path, but can be used on the upright cooling
system on the bug too. They replace the under-cylinder flat plate
deflector (the smaller under-head deflectors stay in place), and
they control the airflow around the cylinders much more closely.
They also have "ears" which cup the undersides of the exhaust
valves for better cooling flow around these hot-spots. To fit
to a bug there is usually a little cutting and bending to do,
but it's not a hard job. The underside plenum pieces (which turn
the used cooling air backwards) must still be used. These cool-tins
actually reduce airflow around the cylinders a little (but use
it more efficiently) and the resulting increase in pressure in
the shroud above (from the reduced airflow) provides more airflow
to the hotter running heads, for better cooling all round.
Note from a source we trust - Cool tins have been tested and it has been proven that they do not work well with the Type 1 fan and cooling components. It was more of a "hey we have a warehouse full of these, lets market them" gimmick than a real solution.
- If you are running a car with a solid engine lid (up to and
including the '69 lids), and you have a 1600cc (or larger) engine
with the doghouse fan shroud and oil cooler, then your engine
WILL run short of cooling air at higher speeds. VW started adding
slots to the engine lid from 1970 onwards, first two sets of slots
in '70 and '71, then four sets from '72 onwards, because the doghouse
fan shroud (from '71 onwards) has a 10% higher airflow than the
non-doghouse fan, and the under-window slots were not quite big
enough. As an example, my '68 with 1600cc doghouse engine (bigger
fan than the '68 1500 engine) runs too hot in summer with the
'68 solid engine lid, but much cooler with the 2-slot engine lid
borrowed from my 1970 bug (whilst it's being slowly rebuilt after
loosing a fight with a nasty Ford).
- Some think that installing an oil sump will bring about greater
cooling of the oil. All of the advertisements say that adding
a sump increases cooling; however, Gene Berg says it just gives
you more hot oil and is only advantageous in racing and hard cornering
applications (to prevent oil surge -- not to increase cooling).
The surface area isn't much more for additional cooling, and you
also lose a couple of inches ground clearance. Oil sumps are good
for racing, but not for cooling.
- An oil temperature gauge is always a good idea, but don't get
hung up on the actual number because it will vary with the engine,
the quality of the gauge and so on - just using it for a while
will give you an idea of what is normal for your engine in different
driving styles, and then if you see if above the "normal" you
will recognise it as such.
- One very simple idea is to install a Gene Berg dipstick. This
replaces the normal dipstick and one wire connects to the oil
pressure sender just behind the engine pulley on the left side
of the case. This sensor will then start the oil pressure light
in the dash flickering at about 215F (I think - I forget the exact
number) and turn it on steady at about 225F (or something like
that). The oil light will still come on steady if the oil pressure
drops too.
So you don't get much indication of the temperature starting
to rise, but you get a good warning once it's become too hot,
and you can back off the power, change down a gear on a long hill
climb or whatever, before the engine gets REALLY hot.
- Driving style can certainly affect the engine temperature. Constant
hard acceleration and braking will heat the engine. If you have
to brake hard then youve just used more engine power than you
needed. Always shift down a gear before the engine starts to lug
on long hills or when towing a heavy load -- this unloads the
engine and increases the fan speed for better cooling.
- Regarding cooling the engine while driving when hill climbing, if the speed drops below 50mph, shift down the third gear. This speeds up the fan for better cooling. If you need to, you can drive
a Bug in 3rd gear up to 60mph - it sounds very noisy but the engine
is running at a very safe 4500 rpm or so at that speed in 3rd
gear. The extra fan speed will certainly lower both oil and cylinder
head temperatures.
Weve occasionally
heard of people driving at low speeds in 4th gear -- low rpm --
to reduce the temperature of an overheated engine. In fact it
works just the other way around. Since the oil cooler is in the
cooling fan's air stream, the best way to cool a hot engine is
to cruise in 3rd gear rather than labour the engine in 4th. This
way you are keeping the cooling fan's speed up without asking
for any extra power from the engine.
- It has been suggested that the thermostat be removed during the hot summer months, then replaced in late Autumn. Rob suggests that it is better to leave the thermostat in place, particularly if you have an oil temperature gauge in the dash and can monitor the oil temperature. Then as you do a run you can watch the temperature. If it does start to get up towards 225F, back off to 50 mph or so and see if it settles back down after a few miles (it won't be instant). If you know that the thermostat is expanded when the engine is hot, removing it will not provide any extra cooling.
There you have it. Use all the stock parts of the cooling system,
properly fitted and without any exposed holes in the tinware, use
the right fuel, set the carburettor mixture right, drive sensibly,
and your engine will run in its preferred heat range in summer or
winter.
Credits and references -
*
* * * *
|
|
