|
||

|
|
Muffler DiscussionPlease see also -
The following subjects are discussed in this article -
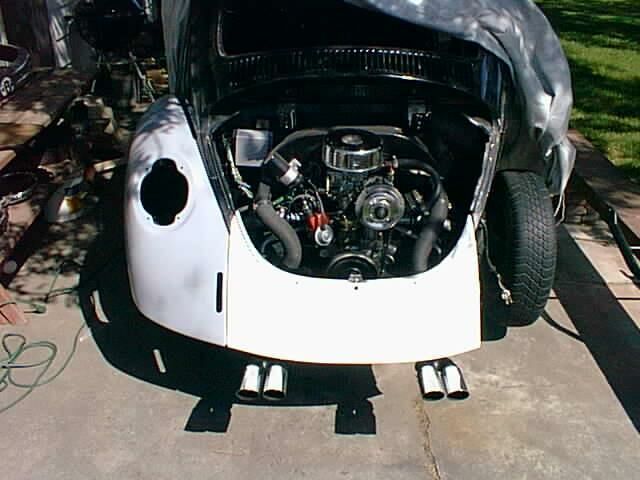
Description of the Standard Exhaust SystemThe standard beetle muffler is surprisingly efficient for the cramped space. They cope with this by having the two front cylinders exhaust straight into the muffler (via the heat exchangers which are also the headers), but the two rear cylinders have headers internally in the muffler. The header pipes actually cross over inside, so the left rear vents close to the right tail pipe and vice versa. (This is part of the reason for the distinctive beat of the VW engine.) This gives each cylinder an equal length header, but no extractor effect, as the gasses just mix any-old-how inside the muffler before exiting the tail pipes. A well-designed extractor can therefore get about 2-3 hp extra, without any other alterations to the engine. Trouble is, most extractors either have a low hanging muffler (the extra pipes take up the original muffler space), or the muffler has to hide under a rear fender, behind the wheel. The term extractor here means equal-length header pipes then running 4 into 1 before the muffler. The angle of the 4-into-1 fitting is as shallow as possible so the exhaust gas from one cylinder rushing past the other three openings at the join causes a reduction in pressure in those three pipes, so when the next exhaust valve opens, the gases are partially extracted by the lower pressure. The length of the header pipe before the join is important to tune the pipes to the engine speeds, too short or too long and you get unwanted harmonics in the exhaust stream which interferes with the extracting process. Even on drag racers without the 4-into-1 (or 8-into-1 etc), you still see the header pipes, and the length of these is important -- short pipes for high revs. I read somewhere that the VW engine needs at least 20 inches on each header before they join up. The trouble with the rear headers is that you still have to get access to the two exhaust mounting bolts, so they cant easily turn the pipes too sharply to get it out of the way of the heater hoses. This is why on the original system the exhaust header runs THROUGH the (fattened) heater pipes. Dave wrote - "Equal length" ... "4-into-1". I do count four pipes running into the muffler, two from the #1 and #3 cylinders that pass through the heater boxes, and two from the #2 and #4 cylinders in the rear. But these don't seem to be equal length, and do they combine "4-into-1" inside the muffler box? Rob responded - The standard muffler does have four equal-length pipes, but two of them hide inside the muffler itself (the rear cylinders). And in the standard muffler, each header pipe has it's own separate open end inside the muffler -- there is no smooth 4-into-1 plumbing. Looking from the rear of the car: 4 (left rear) 2 (right rear) 3 (left front) 1 ( right front) The === represents the rear cylinder headers crossing over inside the muffler. The // bit is supposed to show #2 internal header bypassing the internal header for #4. Both pipes are in fact almost straight-- across the inside of the muffler, and almost touch each other. The outlet for each is near the 'opposite' tailpipe. #3 and #4 have very short conical ends with holes in them, pointing straight at the rear of the muffler (end on in the diagram above, so simply shown as 'O's). The centre 'O's represent the peashooter tail pipes. The four other 'o's represent the inlets on the front side for each cylinder. The bottom ones come via the heat exchangers, which are the headers for the front cylinders. The 4-into-1 systems have exposed pipes curling around where the normal muffler sits, with the 4-into-1 join in the centre, and usually have an in line muffler (one pipe in, one pipe out) under the rear apron/bumper much less ground clearance. The alternative is to take that one outlet pipe (4 into 1) over to the area behind one fender/rear wheel, and place the muffler there. The stuffing in the peashooters is the actual muffler -- the 'muffler' is just an open expansion box. Take the peashooters off and it's quite loud. A variation to this is the 4-into-2-into-1, with cylinders 4 and 1 joined, and 2 and 3 joined (it has to be this combination to get the right harmonics in the exhaust pulses), then these two outlets combined after about a foot, then the 'in line' muffler after that. If I had the equipment, I'd love to try building an extractor exhaust system myself, and see if I could fit it AND a muffler (small 'hot-dog' type) in the same space without hanging under the car. A real contortionist exercise -- both mental and physical. The physics are not too difficult, you just need each header pipe the same length, and at least 20 inches long before they join, and get the 4-into-1 join at 45 degrees or less for best 'extraction'. I don't have a pipe bender or mig welder, so I guess it will remain a 'pipe' dream. :-) The standard muffler is hard to beat for convenience, and it's surprisingly efficient too. If you do stay with the standard set-up, one thing I'd check is that when you buy a new muffler, have a look inside it where the lower cylinder headers slide in. Most standard mufflers have a cone shape in there with small holes through it, so the exhaust gases get dispersed as they enter the muffler. On the one I just fitted, this cone had only a few of it's holes properly exposed inside the muffler, the rest were blocked by the sides of the hole the cone sits in. I drilled out some of the good holes a little larger, just so there was no restriction to the exhaust. Someone wrote to ask - I am driving an 1600cc automatic transmission car and using a straight-through design muffler. After the muffler is installed, there is considerable loss of torque and power. I was told by a shop that I should have used a chambered muffler instead of the straight through type because my car is an automatic type. I am confused, as I read in the Websites that the straight-through muffler produces the highest horsepower as it allows more air to flow through. Is the above statement that a chambered muffler is more suitable for my car true? Rob responded - Muffler design is something of a science and I'm no expert, but some cars work better with a little back pressure inside the exhaust system - a straight through muffler in this case would change the gas-flow balance and could reduce power. It has to do with resonance (pipe length changes the rpms at which you get a resonance inside the pipe and resonance can cause excessive or complementary back pressure), valve timing and such. I don't know exactly what difference an auto transmission would make though. Dave's GT 4-Tip Sports Exhaust System - Our car had the non-standard GT 4-Tip Sports exhaust system when we bought it. It has chromed bell tips rather than the standard "peashooters" -- these "contain resonators that combine to produce a smooth, mellow exhaust note" (a direct quote from an old Rocky Mountain Motorworks catalog. It sounds a little noisy to me, but my son really likes the way it looks ("Cool!"). 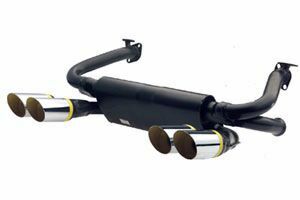 The GT 4-Tip Sports MufflerThe muffler has two exit points, one on either side of the expansion chamber. The tail pipes from these two exit points each divides in two, thus producing four chrome-plated tail pipes, bundled together in two. See the picture above. The car definitely "fweems" -- it's a little on the loud side but kind of mellow, much like a glass pack. It's the design that makes it a bit more noisy. We always know when our son is coming home -- several blocks before he arrives! Oh - the LOUD kind of mellow :-), Rob said. This muffler is not a particularly good fit around the heater holes in the tinware, and the exhaust pipes that run from the heater box outlet into the muffler goes directly underneath the hole in the engine tin that the fresh air tubes pass through, thus making routing of the fresh air tubes difficult. The GT system doesn't have the normal metal tube bit under the tinware to the heat exchangers, and the 'paper" tubes have to be extended tubes through the tinware to the heat exchanger itself. This makes for an awkward fit around the exhaust pipes, a potential for chaffing where the paper tubes go through the tinware, and thus the potential for leaks. This is probably part of the reason why hot air flow up the left side is restricted (and of course the left side is the more important one here in the US, being the driver's side and thus the side that needs a clear windshield the most). Rob wrote - The muffler I have on mine at present isnt a good fit around the heater holes in the tinware either, and I had to construct a special fitting each side to poke up through the tinware, mating to the metal tube which surrounds the rear cylinder exhaust pipes. They look like two very short tubes soldered one on top of the other, but slightly offset, and with a slight kink as well. I made them up from a bake beans tin and solder. It's worked very well, but it SHOULDN'T be necessary. A bit later Dave wrote - I discovered the other night that we're probably going to have to replace my GT 4-Tip Sports muffler soon. I noticed that one of the two sets of bell tips was out of kilter (pointing a little inward) - I must have grabbed it when skooching myself out from under the car. Obviously the metal is weakened and will probably fail soon. I find the price of the muffler ranging from $45 to $75. I like to get things as cheaply as possible, but I'm also convinced that you usually get what you pay for. I've developed a bit of confidence in the higher-priced parts supplier, but is that worth 30 bucks? Rob responded - The one thing I see on the newsgroup all the time is "buy good quality". So I'd be asking questions about the cheap one (Mexican/German/Korean or what?) before deciding. The first time he removed his engine, Dave learned the hard way that the GT Sports muffler must be removed first. When attempting to drop the engine, the muffler became very tightly bound up between the engine and the rear apron, even with all the nuts off. To get it out Dave had to remove the right heater box. Having the engine pulled back (disengaged from the transmission) was part of the problem, but the GT Sports muffler sits at an angle immediately in front of the rear apron. Dave found that it is impossible to get the engine out with this muffler attached. While laying on his back looking up at the wedged-in muffler, Dave noticed from the inside the two little cutouts in the rear apron that the peashooters on the stock muffler extended through towards the rear. Whoever "customized" this car installed a new rear apron right over the top of these cutouts so that the bottom of the apron is level all the way across. The four large chrome tips on the GT Sports muffler (two on each side) extend out the back below the lower edge of the rear apron (see the picture above). Dave later installed a fiberglass rear apron without the standard "peashooter" cutouts.
 New Rear ApronRust/Muffler RepairDave reported an unpleasant discovery - a crack where the tail pipe attaches to the muffler on the right side (he thought the car had been sounding awfully noisy. So, not being in the mood to replace the muffler right then, he was off to the auto parts store to get some "Muffler Mender." Dave stretched out in back of the car and filled the crack between the muffler and the right tail pipe with JB Weld, then pulled it back into place and held it with string until it was set up. Dave added some "Muffler Mender" the next day. (This hokey little fix didn't work very well.) Dave dreaded the muffler replacement job, primarily because of the rusty studs and nuts he was afraid he would break off. But he was encouraged by the promises that the much-touted Kroil Penetrating Oil makes. Dave was pleased to find that Kroil does indeed live up to its reputation - it's an excellent product for use in removing rusty, seized nuts and bolts. With liberal use of Kroil, removing the flange nuts turned out to be piece of cake. Muffler ReplacementBecause the VW has it's engine in the rear, "front" and "rear" descriptions can easily get mixed up. It's normal convention in VW-speak that front means front of car, not "closest to what I'm looking at". So the fan belt is at the rear of the engine and the clutch is at the front. If you are new to VWs, remember that all bolts/screws are metric, so it's a good idea to get a set of metric box wrenches (ring spanners in Aussie-speak), open-end wrenches and socket wrenches. The main sizes you will use are 6mm, 8mm, 10mm, 13mm, 14mm and 17mm (17mm needed if you ever decide to remove the engine from the car) and 19mm for removing the oil drain bolt and turning the engine over by turning the generator/alternator pulley nut. Before you remove the muffler, have a real close look at the fittings where the exhaust pipes for the front cylinders curve back through the heat exchangers to meet the muffler -- these are the lower exhaust fittings on the front of the muffler itself. The upper pipes bolt directly to the head with two studs each side (these can often be rusty and hard to get moving) but the lower fittings are a sleeve fitting with a clamp around them. The ends of the exhaust pipe itself go into the muffler sleeve, and these stub ends eventually rust away, causing exhaust leaks, and these can eventually break off entirely. You can get replacement stub ends if needed - you saw off any remaining rusty end back to the collar which is right next to the heat exchanger (which surrounds those exhaust pipes), and then hammer the new end into the exhaust pipe before fitting a new muffler. The ultimate repair for this problem is to replace the complete heat exchanger, but the replacement stubs will do a good job if the rest of the heat exchanger is in good condition. It's worth checking this out before you start the removal so if you need the replacement stubs you have them handy. Another part of the visual check is to look at the pipe between the clamp on the front of the muffler, and the heat exchanger itself. Only about 1-inch of exhaust pipe is exposed, but you'll be able to tell if the stub-end looks badly eaten away, and if the fitting is badly worn you may see black sooty marks where exhaust gases have been shooting forward. Any exhaust leaks here can often be smelled with the heaters turned on inside the car - exhaust gas squirts straight at the heat exchangers. The exchangers are only stamped metal sheeting surrounding the exhaust pipe, so are "leaky". Make sure that the muffler kit you buy has all of the fittings that will be needed - clamps, fat fibre washers for the lower sleeve fittings, flange gaskets for the upper fittings and so on. When buying a muffler, it pays to check if it's a "complete muffler kit" first - not just the bare muffler. One tip for inserting the peashooter exhaust tips into the installed muffler - tap them in as far as they can go and then pull them back out about an inch (exact distance is not critical). The reason for this is that inside the muffler there are a couple of cross-over pipes for the rear cylinder connections (so each cylinder has a header pipe of the same length but the front two cylinders have there header pipe exposed and surrounded by the heat exchangers). If you tap the exhaust tips hard up against the internal header pipes, you'll create a slight back pressure inside the muffler (partly block the exhaust tips). Once the muffler is installed, the exhaust tips should project an inch or so past the bumper bar. One further point - your muffler kit should come with small flange gaskets for the two ends of the heat riser, one on either side. Originally VW had a smaller hole in one gasket and a larger hole in the other, to control the amount of gas flow in the heat riser. If your kit has the same sized holes it's no problem (the heat riser will just run a little hotter), but if it has the small/large hole arrangement, the small hole goes on the DOWN side of the heat riser - that's the side with the curved pipe into the front of the muffler. I can't tell you which side that will be - I've seem replacement mufflers are made which work in either direction - the curved pipe can be on either side. Some muffler kits don't even have the curved pipe these days, they have an extended fitting on both upper flange fittings (for the rear cylinders) which means gases pulse back and forth between the two rear cylinder muffler flanges. In this case, the large-hole flange gaskets are definitely needed as the gas flow is less with the pulsing fitting. Also make sure that the holes in these flanges on the new muffler are drilled right through into the exhaust pipe - most replacement mufflers and headers have the fitting but they are left undrilled, so the gases can't flow and the heat riser is therefore inoperative. They still HAVE to have the fitting itself since the heat risers supports the weight of the carburetor and stops the center section of the main intake manifold from rotating in the rubber boots, which it would do with the weight of the carburetor slightly rearward of the intake manifold as it is. Note: The heat riser flanges are not drilled through into the exhaust pipes because the muffler or header is sold both to single- and dual-carburetor systems. The dual carburetor systems do not need heat risers, so the flanges are not drilled through, making it necessary that the single-carburetor owner drill them through himself. It is very important to make sure that the flanges are drilled through, otherwise hot gases will be prevented from flowing through the heat risers and the base of the intake manifold will not be warmed to ensure complete vaporization of the fuel pumped down the throat of the carburetor by the accelerator pump. Remember - everything on the VW engine is inter-related and relies on "something else" to be there too. But VW engines are relatively easy to work on compared to most modern engines, and they sure reward you with a nice ride when they have had a dose of TLC! Heat RisersWhile you have the muffler off, be sure to check that the heat riser is still clear -- it can be done with the manifold still on the car. Check out our Heat Riser Procedure. The heat riser starts to get blocked with carbon as the engine slowly wears out and starts to burn a little oil. Dave posed a question -- do you know what the two little box-shaped protuberances on the outside front (near the #2 and #4 spark plugs) are in aide of? I can't see any useful purpose for them. And it appears that these pieces are supposed to bolt to the fan housing -- there is a captured nut on the other side of the hole for the purpose. In general, do you know the utility of these pieces? I surmise they are to help keep exhaust gases out of the engine compartment. Most people just take them off and throw them away, I'm told. Rob responded - Hopefully there will be no exhaust gases to keep out (once the heat risers are bolted up right :-) but these pieces ensure that there is no mixing of used cooling air with the upper side of the engine. There is a partial vacuum in the upper engine compartment when the fan is running and higher pressure air right at that point as the cooling air exits the head area, so any dirty/used air underneath will be attracted upwards through those holes to contaminate the fresh cooling air. And yes -- they do bolt up to the fan shroud. On mine they have some lagging on the underside, which is supposed to seal around the heat riser pipe. Even if this is missing on yours, it will sure help a lot to have them there. Most times you'd get away with removing them, I think (so long as there are no exhaust leaks to get into the fan and heaters, but in hot climates the mixing of used cooling air with the fresh stuff might cause some engine overheating. Dave wrote - I need to find a working heat-riser section of the manifold. Two places said they'd sell me used ones, but it would certainly be clogged completely. I'd like to avoid hours of work clearing one if I can. It's more pricey if I go "standard muffler" but this (plus a replacement heat riser manifold section) would also give me carburetor de-icing, which I will need occasionally in winter. At present I have neither cabin heat nor heat riser connections available with this weird exhaust. Rob responded - The standard muffler sounds like the best. "Curly Pipes" and "Bulgy Things"One small oddity. The current replacement mufflers have the heat moving the opposite way through the heat riser -- the small diameter curly pipe is on the right side of the muffler, not the left. On the original system (1970 and earlier cars), it takes the exhaust gas from the right rear (#2) via the fitting there, flows right to left, and the left fitting is the curved pipe to the "front" on the muffler opposite the left peashooter. On this muffler, the flow is left to right, and the curved pipe curls down behind the right peashooter. Since this is the side used for the carby inlet pre-heater, the space is mighty tight, and the elbow (the metal pipe under the tinware which pulls air from the cylinder head area) for the pre-heater "sits" on the curved pipe - the curved pipe really needs a dip in it to clear the pre-heater elbow properly. The right side cabin heater bugly bit which takes the air from the paper tube around the #2 header and into the heat exchanger doesn't quite line up with the hole in the rear tinware either. I've had to make an offset tube out of a cat-food tin so I can get cabin heat on the right side. It looks like a tube cut into two shooter tubes, and then placed back together but slightly offset so there are "new moon" shaped gaps on both sides. These I've filled with soldered bits of cut cat-food tin. The tubes themselves are soldered too. It works well, although the slight restriction in the inside of the tube because of the offset probably reduces the flow a little. I had to do this with a muffler I got for my 1970 Bug many years ago too -- I thought it was probably an aberration, but it seems that's not the case. You'd think it would be easy enough to alter the pattern a little so they line up better. The only other alternative would have been to cut a larger hole in the tinware, and then you'd have more air leakage from under to upper areas of the engine bay, and with the solid engine lid I on my newer Bug I DON'T need any cooling air leakage. Dave wrote - A picture in a old Rocky Mountain Motorworks (now Mid-America Motorworks) catalog shows the small diameter "curly pipe" on the right side of the muffler and the right side of the "bulgy thing" after 1963. The "curly pipe" moved from the right to the left side of the right-hand "bulgy thing" between 1965 and 1966. Rob wrote - The curly pipe was on the left side of the muffler when I bought my 70 Bug (exhaust flow right to left). Seems that they've settled on left to right flow (curly pipe on the right) for all the South African made mufflers we get here in Australia. With the Australian dollar being low compared to the US and European countries, getting mufflers from these sources is prohibitive. The German made complete kits (with peashooters, clamps, etc.) is over $200 Australian! A single peashooter here (South African made) is around $10 - I think it was about $3.45 US in the RMMW catalogue. Heat ProblemsDave began to experience a problem with the new paint on his fiberglass rear apron blistering from the heat of the muffler. He wrote - I've been calling around today trying to find something to insulate the rear apron with. Finally it was suggested to me that instead of trying to put something on the inside of the apron, I should insulate the muffler itself. I understand that something called "header wrap" is made precisely for that purpose. NAPA will sell me a 10-ft piece (every place else I called would only sell it in 50-ft rolls), so I'm going to go down there tonight and pick some up. I guess it will have to be wired to the muffler. Rob responded - Sounds like it would work. The only problem I can see is that short runs would produce condensation under the wrap (repeated heating a cooling would draw air into the gaps in the wrap), which might cause the muffler to rust out sooner. I've seen comments about this on the newsgroup a couple of times. I wouldn't be a big problem if the car is normally driven more than about five miles a time I would think -- that should be enough to cook out any moisture from the previous cooling. PeashootersSomeone wrote - Just recently I replaced the tailpipes on my 71 Super. Prior to that, the vehicle had the classic 'fweem' sound to it. Now it doesn't. What happened? The pipes look and seem identical to the old ones and were bought from Aircooled.Net on the web. I seated them in as far as they would go in the muffler. Should they not be in that far? Or does that matter? That's the only thing I did -- the muffler is the same. Rob responded - Inside the muffler are two "header" pipes which cross over each other, so that all cylinders have a header pipe the same length - the front cylinders have the heat exchanger pipes, and the rear cylinders have their pipes hidden inside the muffler. When you push the peashooter exhaust pipes all the way in - they hit those header pipes, and may partially block the entrance to the peashooter - this can alter the sound. Try pulling the peashooters out about an inch, and see if this makes a difference. The correct length means there will be good exposure of the inner end of the peashooter so the exhaust gases can get into the tail pipes without restriction. I suppose the peashooters DO have the internal perforated pipe and stuffing between the perforated pipe and the chrome outer pipe? THIS is what provides most of the casual muffling - the "muffler" is in fact an open expansion chamber, which provides little muffling in itself. Muffler "Fweem"Someone wrote to ask - How do I make the VW muffler "fweem" louder? I have the normal cheap tailpipes with a standard 2-piped muffler. They are all new, the only time I hear that high-pitched noise is when I rev it on idle. And even on idle it's only very quick. When I drive all I hear is a loud sound, like a lawn mower crossed with a plane. How do I make it do that high pitched "fweem" sound louder? Should I to push the tailpipes to a certain length? I have them in about a 1/4 the way in. Rob responded - Do your tail pipes have the inner perforated pipe with stuffing behind the inner wall, or are they plain pipes? The whistley part of the fweem comes mainly from the inner perforated pipe inside the peashooter tail pipes - it's smallish in diameter, which speeds up the speed of the exhaust gases - it's like blowing through a concertina tube which tends to make a whistling sound. You should push the tailpipes all the way in and then pull them back out about 1/2-3/4 inch (12-19mm). That gets them right inside the muffler but not blocking the inner end against the inside of the muffler. Another thing - is the muffler a quality South African or German/Danish muffler? I think some of the cheap stuff these days doesn't come with the internal piping of the original design, and that WOULD change the sound since the internal piping of the originals means all cylinders have equal length header pipes. The two rear cylinders should have headers INSIDE the muffler which cross over inside - this provides a large part of the "beat" of the fweem as it means the peashooter tail pipes get pulses of gases 'left left right right' instead of 'left right left right'.
|
||
|
|