|
|
|
Replacing the Master Cylinder
Note: This procedure was written based on Dave's
experience with the replacement of the master
cylinder in his '73 Super Beetle, but the instructions
are pretty much applicable to any aircooled Volkswagen.
~~~
See an alternate procedure suggested by one of our readers.
~~~
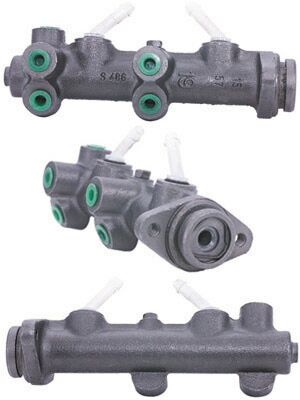
Master Cylinder for a 1970 Standard
Note: Notice in the picture above that there are three outlet ports for the brake lines (plus two for the brake light switches). In the Standards there is one brake line from the master cylinder to each of the two front wheels. There is a single brake line from the master cylinder which runs rearward and then splits in two to go to each of the two rear wheels. In the Super there are just two brake lines from the master cylinder -- one for both of the front wheels, and one for both of the rear wheels. There is a picture at the end of this article that shows a newly-installed master cylinder in a Super Beetle.
~~~
The master cylinder is designed with a dual-circuit system which assures that one set of brakes (front or back) will operate if the other set fails. Three conditions are possible:
- Both circuits intact -- the master cylinder is functioning properly and both the front and rear brakes are operating.
- Front circuit out with the rear circuit operating -- braking action only in the rear.
- Rear circuit out with the front circuit operating -- braking action only in the front.
~~~
Master Cylinder Removal/Installation Procedure
Note: Make sure you have a good assistant!
It's impossible to do this job all by your onesies!
Removal:
- Loosen the left front wheel lug nuts/bolts, then raise the front of car and place it securely on jack stands.
- Remove the left front wheel and put the nuts/bolts where you can find them.
Note: The master cylinder is tucked away up under the car on the left side, bolted to the firewall. A pushrod attached to the brake pedal provides the pressure to the incompressible brake fluid, with operates braking mechanisms in the wheels to slow or stop the car. Attached to the master cylinder you will find two metal lines -- these are the brake lines that contain the brake fluid. Also attached to the master cylinder are two "switches" (or "sending units" if you prefer. These switches sense when pressure is applied to the system, and they send out an electrical signal that turns on the brake lights on the rear of the car. Thus the wires that you will find attached to the switches.
Note: Have plenty of rags handy -- this job can get messy.
- Clearly label the wires that attach to the two brake light switches (so you'll be able to reconnect them correctly later), then disconnect the wires from the switches and let them hang out of the way. If the rubber boots covering the switches are in poor condition, replace them.
- Remove the two fluid reservoir hoses from the top of master cylinder and let the old fluid drain into a suitable container. (Alternately, remove the fluid from the reservoir with a large syringe -- this method is much less messy.) Don't pinch the hoses to prevent losing the fluid, since it is better to replace the old brake fluid anyway.
WARNING -- Do not start a siphon with your mouth or spill brake fluid onto the car. Brake fluid is both poisonous and damaging to paint.
- Inspect the brake fluid reservoir and the hoses between the reservoir and the master cylinder. Replace the reservoir and hoses if necessary. It's usually a good idea to install new brake hoses along with the new master cylinder. Get the ones that are specifically designed for brake fluid -- they're usually blue in color.
- Use a crescent wrench or a 15/16-inch open-end wrench to remove the two brake light switches. It is easiest to remove them now so you won't have to hold the old master cylinder in a vise to loosen them later. If you plan to replace them, you can just leave them in place to be discarded with the old master cylinder.
- Use an 11mm line wrench (flare nut wrench) to loosen the threaded fittings that attach the brake lines to the master cylinder. They are usually very tight and sometimes a little rusty. Don't use a regular open-end wrench for this purpose because it may round off the fittings. Once you have the two metal brake lines removed, seal them with dust caps to prevent contamination from dirt or water.
- The new master cylinder may have plugs in the reservoir inlet fittings on the top. If so, make sure you remove them so the master cylinder can readily "communicate" with the fluid reservoir so that pressure can be relieved as designed.
- Crawl out from under the car and crawl into the cabin on the driver's side to face the pedal assembly. Under the brake pedal you will find two 13mm bolts that face into the firewall. These are the master cylinder mounting bolts; loosen them with a 13mm socket (we find that a swivel socket works best). It is not necessary to remove the pedal assembly or the brake pedal pin to do this.
Note: Don't pull out the master cylinder mounting bolts completely out if you can help it -- there are steel sleeves over the bolts which can fall and be lost if you remove the bolts completely. The purpose of these sleeves is to prevent the two sections of sheet metal through which the mounting bolts pass from buckling as you tighten the bolts.
If you do remove the bolts, be sure to reach in through the large master cylinder hole and pull the sleeves out with the bolts. If one or both of the sleeves is missing, the master cylinder will not be properly supported and will flex away from the pan when pressure is applied. Locating replacement sleeves can be difficult, but they can easily be made out of an old cylinder head valve guide tube, available from your local auto parts store.
- Have an assistant remove the old master cylinder as you loosen the two mounting bolts. Leave the mounting bolts in place if possible.
Installation:
- Bench bleed the master cylinder before installing it. See our procedure for Bench Bleeding the Master Cylinder.
Note: Bench bleeding the master cylinder is VERY important! You CANNOT get all of the air out of the master cylinder by trying to bleed it in place. We have made this a separate procedure because the process is quite lengthy and takes a bit of time. But it is essential that you do it (listen to the voice of experience!).
- Have a helper put the thoroughly-bled new master cylinder into place while you guide the pushrod and start the two mounting bolts. Don't tighten the bolts completely yet, because it is much easier to start the metal brake lines if you can wiggle the master cylinder around a little bit.
Note: Don't forget the sleeves on the mounting bolts. Again, be very careful not to pull the mounting bolts too far back while installing the master cylinder, as you may drop a sleeve into the "black hole" below the bolts. It can be a nightmare getting these sleeves on the bolts between the sheet metal, but they MUST be there! We finally resorted to attaching the sleeve onto a Popsicle stick with a cable tie while we ran the bolt through into the threaded hole in the master cylinder. It will be best to send the wife and kiddies away during this process -- you may turn the air a little blue!
Note: Make sure the pushrod enters the boot and the master cylinder properly, and make sure the boot doesn't get crimped and that it protrudes through the hole behind the brake pedal as it should. The vent hole in the boot goes downward.
- Remove the dust caps from the brake lines and start the fittings into the two threaded holes on the side of the master cylinder (the topmost holes; the lower ones are for the brake light switches). After the fittings are started, tighten the master cylinder mounting bolts from inside the cabin.
Note: There are just two brake lines from the master cylinder. These split further down stream to go to the front and rear wheels respectively.
- Tighten the threaded fittings on the brake lines with the 11mm line wrench.
- Install the brake light switches and tighten them with 15/16-inch wrench. Reattach the brake light wires per the labels/sketches you made previously. Install the protective rubber boots securely over the sending switches and attached wired.
- Adjust the length of the pushrod so that there is 1mm of play between the end of the pushrod and the piston inside the master cylinder. This can also be done by adjusting the pushrod such that there is about 1/4 inch (5-7mm) of freeplay at the top of the brake pedal. See our Brake Pedal Free Play Adjustment Procedure.)
- Check to make sure that your pedal has about 1/4 inch (5-7mm) of free play at the top of the pedal. (See our Brake Pedal Free Play Adjustment Procedure.)
Note: This is VERY important and VERY difficult! (That's why a separate procedure.) Take your time and fine-
tune your fingers for delicate work! Its hard to feel 1mm between the end of the pushrod and the piston inside the master cylinder. Its easier to feel 1/4 inch at the top of the brake pedal, but not much. Just realize that you are making a very delicate adjustment, and take your time!! You'll live to regret it if you don't, believe me!
Sub-note: VW states that the length of the pushrod must be very precise -- exactly 5.433" long plus or minus 0.019". Without some pretty precise instruments, thats very difficult to achieve. Its easier to adjust the brake pedal freeplay, as discussed above and in the Brake Pedal Free Play Adjustment Procedure. But the operation is still pretty tough! Believe me, we had more trouble with the pushrod adjustment than I care to think about! If its wrong, the piston inside the master cylinder can cover up the hole that goes up to the brake fluid reservoir, thus making it impossible for the pressure in the system to be relieved. And this is a BIG problem, as we discuss in detail in our Brake System Pressurization article.
- Refit the reservoir hoses (use hose clamps on both ends) and fill the fluid reservoir with fresh brake fluid.
CAUTION: Use only new, unused brake fluid that meets SAE recommendation J 1703 and conforms to Motor Vehicle Safety Standard 116.
- Remove any residual air from the master cylinder as follows:
- First make sure you have a drip pan on the floor under the master cylinder, as this will be messy.
- Loosen the threaded fitting on each output line at the master cylinder (one at a time of course) 1/2 turn or so while an assistant applies the brake (pedal just half way down). Do the brake light switches first, then the two brake lines. Tighten the fitting before the pedal is released.
- Top up the reservoir with brake fluid.
- Bleed the system in accordance with our Brake System Bleeding Procedure.
- Check the reservoir cap to assure that the vent is open.
- Check the brake operation and the brake lights before road-testing the car.
- Reinstall the left front wheel.
- Lower the car to the floor and fully tighten the wheel lug nuts/bolts.
- Carefully road test it to assure that the brakes operate properly.

Here's How the Job in Our '73 Super
Beetle Looked When Completed.
*
* * * *
|
|
