|
|
|
Heater Box Removal/Installation
Condition: You're getting asphyxiated whenever you turn on the heat.
Note: This is a chore -- it's not a lot of fun!
But what an endorphin rush when you're done! :-)
~~~
Parts You Will Need:
- Heat exchangers, left and right.
- Heat exchanger lever kits (2).
- Heater cable clamp kits (2).
- Clamps, heat exchanger to muffler (2).
- Gaskets, heat exchanger-to-cylinder heads (2).
~~~
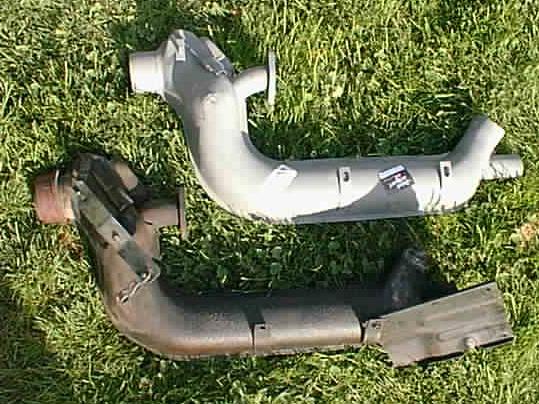
Heater Boxes (Old and New)
~~~
Procedure:
- Back the car into the garage, raise the rear and place it securely blocks.
Note: Support the engine directly under the engine case so the attachment points at the sides can be accessed for the heater box brackets.
- Remove the rear wheels to give yourself more space to work.
Note: Before installing the heater boxes on the engine case, cut off the tabs on the top of the heater boxes, as they are not needed and will hit the underside of the car once the engine is in place. Also, work the heater box mechanism to make sure all of the parts are moving freely.
- Working under the car, remove the bolts that hold the cooling air tin to the heater boxes. Remove the rearmost piece of tin on the right side and stow it and the bolts in a safe place.
- Remove the hot air ducts (the corrugated tubes leading from the heater boxes to the front of the car) from each side.
- Disconnect the heater control cables by loosening the clamp bolt in clamping sleeve with 9mm and 10mm box end wrenches (ring spanners).
- Remove the muffler as follows:
Note: This muffler removal procedure is taken directly from the Bentley repair manual. If your car has some other style muffler; the steps below may or may not apply.
- Loosen the two hose clamps and remove the air hoses and air hose grommets.
- Remove the cover plates over the intake manifold preheater pipe connections.
- Apply penetrating oil (e.g., Kroil) or similar liberally to the bolts and nuts holding the preheater pipes to the muffler. Wait 15-20 minutes and apply again if necessary.
- Unbolt the preheater pipes from the muffler.
- Remove the crankshaft pulley cover plate (if fitted), the rear cover plate, and the air hose connecting pipes.
- Remove the screws and nuts from the flat clamps on the heat exchanger connections.
- Remove the nuts and bolts on the clamps attaching the muffler to the heat exchanger, then remove the clamps.
- Remove the four self-locking nuts that hold the muffler onto the cylinder heads. Then, grasping the tailpipes, pull the muffler to the rear and off the car.
- Apply penetrating oil to the threads of the cylinder head-to-heat exchanger studs and remove the nuts.
- Pull the heater box toward the front of the car until it is clear of the studs and lower it to the floor.
- Remove the old gaskets from the mounting flanges.
- Install new gaskets (dry) on each of the mounting flanges.
- Position the replacement heater box on the two studs in each of the cylinder head mounting flanges.
Note:Remember that there is a left and a right for the heater boxes; so make sure to note which is which - the pull-wire mechanism is located toward the center of the car in each case.
- Install the mounting nuts and tighten them loosely for now so that the entire exhaust system can be easily fitted up. The nuts will be securely tightened later.
Note: Don't forget to snug these nuts up securely once the whole exhaust system if fitted up! Failure to do so will make the task extremely difficult later, with tin and the header in the way.
- Attach the flexible body-to-heater-box couplings to the heater boxes and secure with hose clamps on both ends.
- Attach the heater box brackets to the underside of the engine case (left and right).
- Reinstall the remaining components in the reverse order of removal.
- Before reinstalling the muffler, inspect it for leaks and damage. Make sure that the exhaust pipe flanges that bolt to the cylinder heads are not warped.
*
* * * *
|
|
