Cylinder Heads and Push-rod Tubes
~~~
To go directly to your topic of interest, see the following links -
~~~
Cylinder Heads
Note: Our experience did not include replacement of the valves and rebuilding of the heads. Bob Hoover has prepared a couple of excellent treatises on these subjects, New Heads and Head Job (unfortunately these articles are no longer available on the Internet).
Rob's 2019 note: Here's one of Bob Hoover's great blogs on cylinder heads...I'll let you look around the site for more. Bob Hooover on "heads"
Here we will primarily discuss torquing of the head nuts.
There was an editorial in a past issue of VW Trends about torquing the cylinder heads nuts. About six "experts" are quoted; half of them say that re torquing of the head nuts on a stock engine is not necessary, the others say it is. The editorial summarizes their survey with the following -
The common denominator here seems to be that, if the opportunity presents itself, it is a good idea to at least check the bottom, easy-to-get-to head nuts, and if you are running anything other than a stock 1600cc engine, then it should be done with more regularity. I'll go out on a limb here and suggest that maybe every other valve adjustment or two, take the rocker arms off and check the lower four. You were going to set all the valve clearances anyway, so what's four more nuts? I will also recommend that if you are running more horsepower through a cam, headwork, bigger cylinders and pistons, or more compression, it becomes a mandatory routine. If it stops one minor problem from becoming a bigger one, it would be well worth the extra time and effort.
Bob Hoover and a few others recommend retorquing the heads every time you have the engine out, just as insurance. Since there is no head gasket to allow for any slack, it's more important in a VW engine than most others. The usual result of prolonged loose head bolts is leaking combustion gases at the head/cylinder joint, which burns the heads out and usually the top of the cylinder too -- bin jobs for both. In this case, an ounce of prevention certainly IS worth a pound of cure!
New heads in the US are about $120-140 each (2006 prices), and even cheap cylinder/piston sets are about $100. As VW Trends says above, it is good insurance about every valve adjustment or so to check the lower four head nuts (the only ones you can reach with the engine in the car).
~~~
A Short Primer on Torque Wrench Operation
There are two common types of torque wrenches for home shop use; the "beam" type and the "clicker" type.
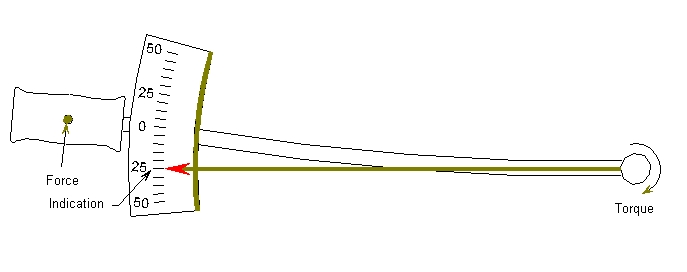
"Beam" Torque Wrench
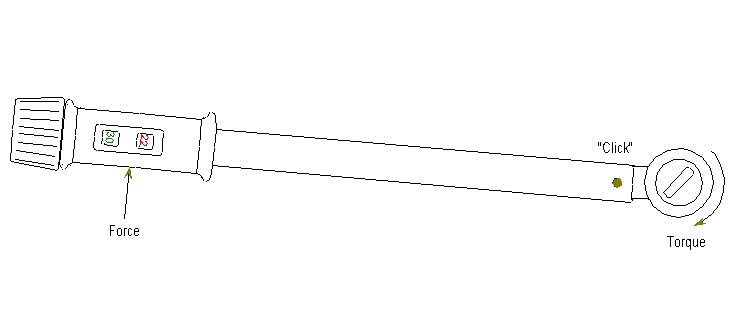
"Clicker" Torque Wrench
~~~
The "beam" type torque wrench is the least expensive torque wrench. Its range is typically 0-150 ft-lbs. The beam wrench works by the beam bending in response to the torque applied -- you simply apply torque until the pointer points at the desired torque on the gauge in the handle. This type of torque wrench is very simple, reliable, and accurate, and there is little that can go wrong with it when used properly. When tightening a bolt, make sure to only apply force in the center of the handle. This allows the beam to bend in the manner it was designed to indicate the correct torque. Do not over torque the wrench or the beam may bend permanently. Do not drop the wrench because rough handling can bend the pointer arm or pointer.
The range of a typical "clicker" torque wrench is 0-80 ft-lbs. The clicker torque wrench works by preloading a "snap" mechanism with a spring to release at a specified torque. When the mechanism releases the ratchet head it makes a "click" sound. The desired torque is set by rotating the handle until the desired torque is shown in scale in the handle (newer wrenches have a digital window that shows the desired torque). The clicker wrench is much easier to use because it is easy to set the desired torque and just pull until you feel the click. The ratchet head also makes it easy to use in confined spaces. It is good practice to set a clicker wrench to its lowest setting before putting it away to prevent the spring from taking a set. Avoid rough handling and dropping because it can damage the mechanism. Do not use the torque wrench to loosen tight fasteners since this may damage the calibration.
Rob says - I like a "bending beam and pointer" torque wrench myself, as you can hold it at the required torque and see if the studs turn a fraction - with the clicker type, once it's clicked you can't be sure you are still holding the right torque, so you have to redo it on each stud 2-3 times to make sure. But if you have the clicker type, use it - retorquing VW heads should be done any time the engine is out of the car - just good insurance. And always after any head work at all (valve replacement or whatever).
~~~
Torquing the Cylinder Heads
Here's the process for torquing the head nuts (the engine must be stone cold) -
- If the engine is out of the car, remove the tinware around the cylinder heads. If the engine is in the car, you will only be able to reach the bottom four nuts.
- Remove the rocker arms.
- Make sure you do the head-nut tightening carefully. There are two tightening patterns: the first pattern to 7 ft-lbs, and the second pattern to the full torque of 18 or 22 ft-lbs (18 ft-lbs for 8mm studs, and 22 ft-lbs if your engine has 10mm studs).
Note: The head bolts are quite visible with the engine out of the car and the tinware off, so checking the size is easy -- simply measure the bolt diameter. If you have 8mm bolts you will probably have "case savers" -- threaded inserts used with all 8mm head bolts to increase the thread area in the soft case. VW changed to the thinner bolts because they expand more evenly with the engine as it heats, so the "hot" head torque doesn't get so high it pulls the bolts out of the case. Even so, Bob Hoover says the "hot" head torque is about 70 ft-lbs -- a lot more than the 18 ft-lbs cold torque! The fitting of 14mm case savers increases the AREA of thread grabbed by the head, in comparison to the thread area of the 10mm studs which were screwed directly into the case material. So the past problem of studs working loose in the case is almost completely eliminated. The 14mm case savers use the 8mm studs.
- First the 7 ft-lb sequence: torque each of the eight nuts to 7 ft-lbs in the sequence shown below -
As you are looking at the cylinder head with the valve cover removed -
top of engine
7 5 6 8
3 1 2 4
- Then torque the nuts again again to 18 ft-lbs for the 8mm studs and 22-23 ft-lbs for the 10mm studs, in the sequence shown -
Do NOT exceed the figures above - they are designed to provide the required 70 ft-lbs of torque needed to seal the heads to the cylinders once the engine heats up.
top of engine
8 2 4 6
5 1 3 7
- If you over-torque a nut, loosen them all (to not less than 7 ft-lbs) and redo them in sequence.
Dave found that all of the head bolts in his '71 1600cc dual-port engine are 10mm, so 22-23 ft-lbs is the correct torque. In his first experience with the head nuts he found that they were all loose -- something like 18 ft lbs. There were little screws/bolts missing EVERYWHERE in the engine tin!
Rob wrote - Maybe your ham-fisted mechanic just knew the 18 ft-lb figure, and uses it on all Bugs! Isn't it amazing how well our Bugs they can run with bits missing. But it feels really good to get it all buttoned up right doesn't it!
~~~
Miscellaneous Correspondence
Regarding the Cylinder Heads
Someone wrote - The engine was pinging like crazy, and it felt like it was running on three cylinders. I took it to a VW specialist; they found the timing to be at 26 degrees advanced and said the head gasket was blown.
Rob responded - The VW engine does not use a head gasket. The cylinders sit inside a recess cut into the cylinder head (this is called fly cutting the head) and a seal is made between the recess in the head and the top rim of the cylinder itself. If this area becomes damaged or overheated in any way, high temperature combustion gases leak out, causing burning of the head and cylinder top, requiring expensive repairs. The "running on three cylinders" you describe is typical of an engine with at least one damaged cylinder/head joint (assuming all cylinders have working spark plugs and the correct fuel/air mixture is being supplied).
Even when setting up an engine for reduced compression (to run on VERY low octane fuel), spacers are normally placed between the cylinders and case, not between cylinders and heads. I'm not sure what your "vw Specialist" was suggesting re head gaskets. But finding the timing advancved to 26 degrees (presumably you mean at idle, not max advance) was a good find. Idle advance is usually around 7.5BTDC and max advance is normaly around 30 degrees (009 distributors) or up to 40 degrees (vacuum distributors).
Another guy wrote - After torquing down the heads on my '67 Bug (cylinders are new and the heads new/rebuilt) I noticed something that didn't look right. The heads didn't seat all the way -- I could still see space between the heads and the cylinders.
Rob responded - Eh??? The heads are fly cut (recess for the heads to fit in), I don't understand how you could see a space between head and cylinder inside that recess. Unless you habe a mismatch between the heads and cylinders.
Since there is no head gasket on VW engine, the mating between the heads and the cylinders is vital -- it's what seals the combustion chamber. ANY leaks there, even tiny ones, will result in burned cylinder tops and/or burned heads around the sealing lip. So don't try to start the engine until you are sure the heads are correctly seated.
The only way the head could be "cocked" so only one cylinder wasn't sealing properly is if the cylinder is not seated in the case correctly (resulting in one cylinder being high), or the head is damaged.
Before the heads go on, you should be able to place a straight edge across the cylinder tops and see it touch the two cylinder rims in four places -- then you know the cylinders are fully seated in the case and are identical heights.
The guy wrote again - I pulled the heads and cylinders to see what was going on. The cylinders do indeed sit flush on that lip in the heads, although there is slight movement (I can wiggle the cylinder back and forth ever so slightly). The gap that I was referring to, (and the part that has me confused), is between the flat part of the head and lip on the cylinder. One of the cylinders sits flush on the raised 1/2 moon portion of the head. But the other three don't quite touch the moon - they are all different sizes, the largest creating a gap .082 (measured from cylinder lip to flat part on head, in between moons).
Rob responded - The slight movement of the cylinder is normal. The fly-cut in the heads is fractionally larger than the cylinder rim, so there is room for the cylinder to move just a fraction inside the head. But I still don't understand "flat part of head" -- do you mean the underside of the bottom fin (nearest the case) or are you talking about the inside of the fly cut recess?
The distance between the outermost cylinder fin and the innermost head fin might vary a little - the critical measurement is the length of the cylinder between the case and the outer rim. The case needs a completely flat area where the cylinders slot into the case, and then, with even height cylinders the outer rims of adjacent cylinders will be a perfectly straight line. The recesses (fly-cut) in the heads are cut to an exact depth too, so when the heads go on both cylinder rims will sit straight inside their recess and seal properly when the head studs are torqued.
It's a complicated part of the VW engine design, an unusual design to have twined heads but separate cylinders (horizontally opposed aircraft engines use separate heads for each cylinder for example). That makes it essential that both cylinders sit at exactly the same height, or the head won't seal properly on both cylinders.
~~~
Push-rod Tubes
Please see our Push-rod Tube Procedure.
Rob explained how the push-rod tubes work -
The VW engine has four separate cylinders and and two cylinder heads, and therefore does not have internal openings for the push-rods to sit in, as happens in an "inline" watercooled engine with a full engine block. Therefore the push-rods have to have tubes around them. These tubes provide the return path for the oil flowing back from the valves to the sump, and even provide some cooling for the returning oil which has been heated by contact with the very hot heads, and then flowing past the cooling airstream for the cooler running cylinders. A very clever piece of engineering by Mr. Porsche.
The tricky bit is that since metal expands when it gets hot, the VW engine grows and tiny bit wider each time it runs (and a fraction longer too, but the engine case is not the problem here). So the push-rod tubes have to be able to expand and contract a mm or two, and at the same time must seal against both the heads and the case to provide a closed oil path back to the sump. This is why they have a concertina section at each end -- to provide the "spring" needed to seal the neoprene washers at each end (to the head and case), and to allow for the engine expansion with heat.
BUT -- the neoprene washers do gradually harden with age (takes a long time), and the concertina sections do loose a little of there "spring". So leaks can develop here. And damage/bends to the tubes can make this worse. And they can rust from the outside, resulting in pin-holes.
To check for leaks, get under the car after it has been on a run, and look very closely at the push-rod tubes themselves just under each cylinder. If they look fresh wet with oil, or there is a mess of oily deposits on the cooling tinware under the push-rods, this may be (partly at least) your problem. Be careful -- don't burn your nose on the hot exhaust/engine when doing this!!!
If leaky/damaged push-rod tubes were your only problem, there is a replacement tube which can be fitted without removing the engine I haven't ever used these so I can't describe the process exactly, except to say that the pushrods must be removed, the new tubes installed and elongated to seal at each end, then the push rods reinstalled and the valve clearances reset. But since you may have to install new cylinders/pistons anyway, the original equipment type of tubes can be used. The old tubes will be fine if they are not damaged/rusted (and they must be straight), but you MUST replace all the neoprene washers (two for each tube). The "old boys" trick is to gently stretch the tubes a little (measure the length of each tube, then pull outwards gently on the concertina sections till it's a few mm longer, but don't overdo it) before reinstalling. This provides renewed "spring" to the tubes and ensures a good seal on the new washers.
~~~
The Wisdom of Bob Hoover
Bob Hoover has written an interesting sermon on push-rod tubes (unfortunately Bob's famous sermons are no longer available on the Internet). Just a note or two from the article -
The push-rod tubes form an oil-tight conduit between the valve gallery and the crankcase, allowing multiple return paths for the oil pumped out to the rockers through the push-rods. At overhaul time it's best to use new push-rod tubes since the bellows portion on either makes them especially difficult to clean. They cost about a buck each, cheap insurance
The stock tubes are wizards at getting rid of heat! Given a thin coat of flat black paint to preserve them and lower their thermal resistance, your eight push-rod tubes serve as eight auxiliary oil coolers
Since the push-rod tubes are bathed in the flow of air that has just passed over the cylinders, the air is hot. But not as hot as the oil coming from the valve gallery. The cylinder head is the second-hottest part of your engine (the exhaust valves and stacks are first) and the oil in the valve galleries is typically a hundred degrees or more above the oil temperature in the sump. But that short trip down the push-rod tubes is sufficient to suck a lot of the heat away, thanks to the slightly cooler air coming off the cylinders and the generous surface area of the push-rod tubes.
If you replace your stock push-rod tubes with those trick two-part anodized aluminum jobbies so beloved of show-car freaks, you've just thrown away one of the more subtle gems of the VW engine design.
Whatever you do, don't even think of using two-part push-rod tubes. They will make your engine run hot.
- Bob Hoover (used with permission)
~~~
Rob discussed the two-part push-rod tubes - The two-part push-rod tubes were obviously designed so you remove the rocker arm, pull out the push-rod, yank out the old tubes sideways (probably where most of the gross damage occurred as they are supposed to be removed after the heads are off, put the long section of new tube in place, then compress the spring section on the short piece so it can be inserted and the spring and thin seal seals the two pieces together, while pushing the whole assembly in both directions to seal the ends against head and case. Then put the push-rods back in and replace the rocker arm.
Someone wrote - The mechanic who will be removing my engine said that carbon builds up in the heads, and if I pull out the push-rod tubes the carbon will fall away, so that "natural" seal will disappear and my engine will start passing oil, or burning it.
Rob responded - With respect, you need a different mechanic! The combustion seal is actually the top of the cylinder against the recessed "fly cut" in the cylinder head. Provided the heads and cylinders are accurately cut, and the head studs are torqued correctly, this makes a good seal. This has NOTHING to do with the pushrod tubes and their seals. They come into contact with hot lubricating oil which flows from the rocker cover area back to the sump, and never see any of the combustion gases.
If you are worried about it, you can get push-rod tubes that don't need the heads off to replace - they telescope into position. But there are at least 2 sorts of these, and at least one sort leaks badly (I've never had to use them myself). Ask John at Aircooled.Net about the best ones -- if you decide to used them. Note that Bob Hoover above says that the shiny two-part replacement pushrod tubes don't cool the oil passing through them nearly as much as the stock tubes do. If you want to use the original type, you just stretch the old tubes a few mm and use new end-seals, and place the seams at the top when re-assembling. The original concertina tubes can only be replaced or stretched with the heads removed.
You must install new end-seals when you replace the push-rod tubes, and you MUST stretch the tubes a little before you put them back in, so that they push the new seals into the head and case firmly so as to make a good seal. The tapered side of the seal must point to the heads and case at each end. Measure each one and stretch them only a few mm. If you do it too much they might crack. And make sure that the weld is pointed upwards - just in case it ever starts to leak (unlikely, but....)
*
* * * *
|
