|
||

|
|
Fuel PumpThe following topics are addressed in this article -
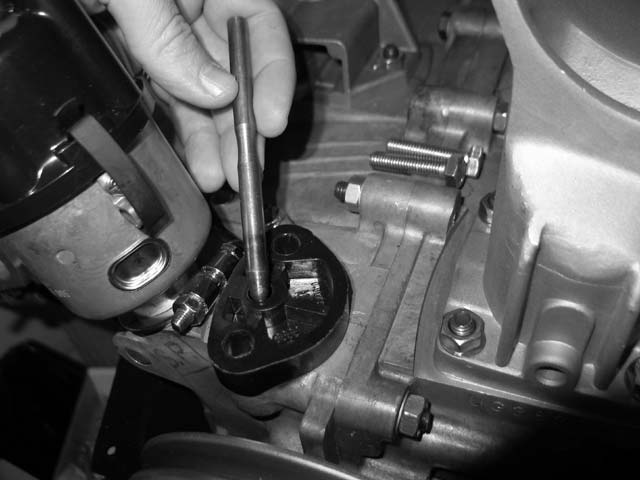
Fuel Pump DescriptionIn the VW Beetle, fuel is delivered from the front-mounted fuel tank through a line to the Fuel Pump in the engine compartment. The fuel line proceeds from the fuel pump to the Carburetor. An eccentric cam on the Distributor drive shaft operates the mechanical fuel pump which delivers fuel to top of the downdraft-type carburetor, where a needle valve, controlled by a float (similar to the float in a standard toilet) maintains the level of fuel in the carburetor bowl. Poor Man's Fuel Pump TestProblem: Your Bug won't start. There are several things to check -- probably the first would be making sure you have spark at the spark plugs. Assuming that you do, the next thing to do is make sure fuel is getting to the carburetor. First, make sure that the line from the fuel tank or the fuel filter in the line isn't plugged. This problem has flummoxed more than one expert VW mechanic! First, disconnect the fuel line at the pump which comes from the fuel tank (around the left side of the engine). If the tank is more than half full, the fuel should run out of this line by gravity. If not, try blowing into the line; if it is clear, you should hear bubbling in the tank. Don't attempt to suck the fuel through the line -- gasoline contains benzene, a carcinogen. When in doubt, look for fuel filters either in the engine bay, over the gearbox where the fuel line comes out of the body, or under the fuel tank up front. Replace any filter you find -- they are cheap enough, and replacing them could save you a lot of aggravation. Once you're sure you have a good stream of fuel from the tank, test the fuel pump. First, make sure it is bolted tightly to the engine. Some older pumps have a small filter under a brass bolt on the side of the pump, close to the fan belt. If so, remove the bolt and clean the plastic filter underneath. Note: Most replacement VW pumps cannot be disassembled and are replaced as a complete unit. There are two Replace the top on the fuel pump, set the parking brake, and put the transmission in neutral. Pull off the hose that runs from the fuel pump to the carburetor at the carburetor end. Put the big 19mm box end wrench (ring spanner) on the alternator/generator nut and turn the engine over the way it goes (clockwise). You should get fuel being pumped out of the hose by the fuel pump. Try it again. Note: You need to turn the engine pulley around twice for each squirt of fuel -- it works off the same camshaft which If you have fuel at the pump but the pump still does not do its thing, you probably have a defective fuel pump. Replacing the fuel pump is one of the simplest VW jobs. Please see our Fuel Pump Replacement Procedure below. If you are getting good squirts of fuel out of the hose, reconnect the hose to the carburetor, take the 19mm wrench off of the alternator/generator nut, make sure everything is connected, let any spilled fuel dry out, then go and try to start the engine again. If you have spark and fuel it should go. If it still doesn't start, you have deeper trouble like the carburetor or the timing is way out of adjustment. The fuel pump works at the same point as you time the engine - across Top Dead Center (TDC) for #1 cylinder. So you can rock the engine back and forward across TDC for #1 (about 45 degrees either side of TDC) and get some fuel flow, but if the pump is empty, it takes a LOT of pump strokes to see any flow (I've tried it). One other thing - I suppose you have the right pushrod for the right pump? The original pump style is tall and uses a longer 108mm pushrod. The later style is short (dome shape on top) so it will fit under the alternator on those models. This pump style fits all cars so long as the shorter 100mm pushrod is used. So if you replaced a shorter style pump with the original taller style, you have to change the pushrod to the long one or it won't pump at all. And of course if you use the short pushrod in an old style pump, that wont work either. Fuel Pump Replacement ProcedureWARNING: Gasoline is extremely flammable, so take extra precautions when you work on any part of the fuel system. Don't smoke or allow open flames or bare light bulbs near the work area, and don't work in a garage where a natural gas-type appliance (such as a water heater or clothes dryer) with a pilot light is present. If you spill any fuel on your skin, rinse it off immediately with soap and water. When you perform any kind of work on the fuel tank, wear safety glasses and have a Class B type fire extinguisher on hand. Fuel Pump Removal
Note: Carefully note which port on the fuel pump receives the line from the fuel tank and which port runs the line Note: On 1965 and earlier models, unscrew the inlet line with a line wrench. Fuel Pump Installation
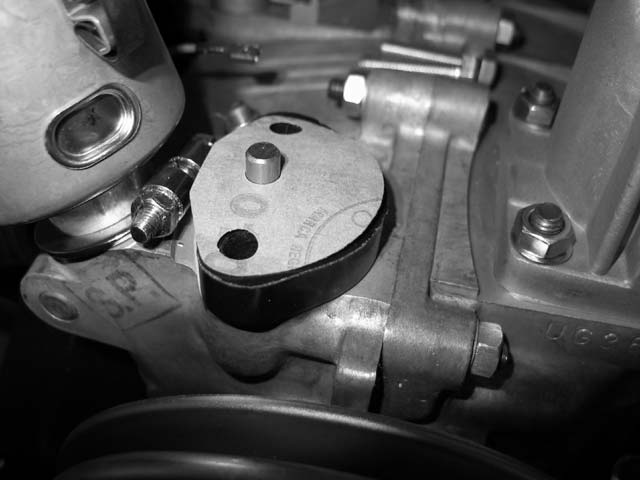
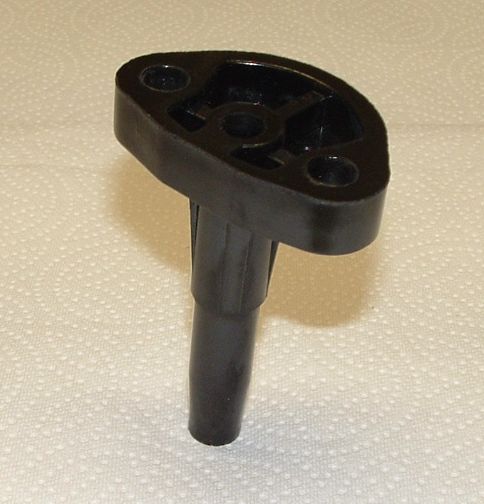 Fuel Pump Insulator Block
Note: The fuel pump used with an alternator uses a 100mm pushrod. The fuel pump used with a generator used a 108mm pushrod. However, to make it more complicated SOME 15 degree-angle pumps can have the lever/arm way up in there and actually need a 4-1/4" pushrod. Make sure you have a pushrod of the correct length for your system.
Note regarding pushrod stroke -If you find that there is too much stroke, add gaskets to the top of the flange. If there is not enough stroke, lay a piece of sandpaper on a flat surface and sand the flange a little at a time until you attain the measurement you are looking for. Keep in mind, you need at least one gasket between the flange and the fuel pump. You can also check to see if your fuel pump is properly shimmed with the correct amount of gaskets by connecting a fuel pressure gauge to the output of the pump. The pressure should read between 1.5 and 3.5 psi of pressure through the normal RPM range. The fuel pressure will be too high if the pushrod is too high. You lower it, as indicated above, by adding gaskets between the pump and spacer. You want 3-3.5 psi.
Note: This is the lower chamber in the fuel pump you are filling with grease, not the hole in the engine block where the pushrod and its guide tube reside.
Fuel Pressure Check
Broken GasketSomeone wrote with a fuel pump problem - I have a 64 Type II Bus. I replaced my fuel pump; when I attempted to remove the plastic flange (called the "intermediate flange" in the procedure above) that the fuel pump sits on the flange broke!. So now I have the bottom half of the flange wedged in the crank case. I am going to have to remove and dismantle the whole engine to get at this piece of the plastic flange? Rob responded - I've never heard of this plastic gasket breaking before -- it just sits flat on the case and separates the pump from the heat of the case -- I have no idea why it would break, so can only provide general advice. Can you still see the broken pieces? Can you get at them with long needle-nose pliers, or drill a hole into them and then screw in a wood screw, or self tapping screw and pull them out? If it's jammed hard, could you get at it with a piece of hack-saw blade to cut through it perhaps? Since it's plastic a few shavings inside the case won't cause major problems like metal would, and you should be able to flush them out of the case through the sump plate. Or maybe you could invert the engine on a workbench and work at the plastic from underneath, so any stuff falls out of the case. Other than that - I think you might have to split the case - what a pain. The person continues - I pulled out the wedged bottom piece of the plastic flange by threading a lag bolt into the hole that the push rod moves in. Of course it didn't pull out nice and easy. A couple of pieces broke off in the process, which I feel I recovered most of with a vacuum cleaner. But I am afraid a scrapnel the size of a paper clip (little thicker) fell into the crankcase. Rob responded - Not good, but at least it's not metal. But -- it's anybodys guess as to how much is too much plastic in a crankcase! Try pouring some thin cheap oil into the distributor hole to see if you can wash it down to the bottom of the case -- then you might be able to get it out through the sump plate. I don't know if that plastic will float on oil -- hopefully it will sink to the bottom. Remember that the engine does have a gauze filter around the oil pick-up, so it's not likely anything significant will get in to the oil system at least, so all you really need to worry about is pieces being splashed on to moving parts, so if you can get rid of those you should be fine. Question continued - Backing up a little -- it started by me deciding to replace the gasket under the plastic flange when I was replacing my fuel pump. Initially, I just installed the new fuel pump without this step. But after cranking the engine over with my 21 mm wrench no fuel still would flow from the fuel pump. (the original problem). I have fuel flowing out of the gas line that connects to the pump, so I would assume that by cranking the engine by hand with a wrench would soon produce a flow from the pump (correct me if this is inaccurate). Rob's response continued - The fuel pump works at the same point as you time the engine -- with the crankcase pulley at the TDC mark for the #1 cylinder. So you can rock the engine back and forward across TDC for #1 (about 45 degrees either side of TDC) and get some fuel flow, but if the pump is empty, it takes a LOT of pump strokes to see any flow (I've tried it). Question continued - Then I went to the push rod and thought I would continue with replacing the gasket under the flange. And there we are, with a little bit of plastic in the crankcase. Response continued - One other thing -- I suppose you have the right pushrod for the right pump? The original pump style is tall and uses a longer pushrod. The later style is short (dome shape on top) so it will fit under the alternator on those models. This pump style fits all cars so long as the shorter pushrod is used. So if you replaced a shorter style pump with the original taller style, you have to change the pushrod to the long one or it won't pump at all. Dave's ExperienceDave wrote to Rob - I was lucky when I replaced the fuel pump in our 73 SB, I guess. I bought it from a local auto parts store -- the "squat" type. I just bolted it on, without even removing the push rod, and off we went. Must have been okay, because it works just fine. I asked for the pump for a '71 engine -- and it must have been right. Rob responded - Most of the replacement pumps these days are the squat type, which fit all engines so long as they already have the shorter pushrod. It would probably be a little unusual to see the older tall type now. It was handy that you found it at your local auto parts store - I guess it's one of the more common replaceable items, though they ARE quite reliable (only replaced the pump on my 70 Bug once that I can remember). Dave wrote - I'll never forget the experience I had with the overhaul of a fuel pump on one of my VWs back in 1968 or so. On that model ('63, I think) there was a bolt that went right down through the top of the pump, with a gasket under it. After working on the fuel pump that day, my wife and I went into town for the evening (about 65 miles or so), and when we went to leave the car wouldn't run. The only thing that was different was the fuel pump -- I checked it out and found that the gasket under that bolt was cracked. Fortunately there was a hardware store nearby -- I bought a small faucet washer, and it worked like a charm! Obviously the pressure was leaking out through the hole in the top of the fuel pump (because of the cracked gasket) rather than pumping fuel. I don't think I ever replaced that faucet washer! :-)
|
||||||
|
|