|
||

|
|
Fuel Filter ServiceWARNING: Gasoline/Petrol is extremely flammable, so take extra precautions when you work on any part of the fuel system; such as -
Note: In cars with the fuel filter located below the fuel tank under the car, replacement is easier if the fuel tank is empty. Try to schedule fuel filter replacement when the tank is nearly empty. For standard Bugs which had a fuel filter inside the tank (standing on top of the outlet), the tank MUST be empty, as you will have to remove the gas tank to get at the filter. On cars with the old style upright rectangular fuel pump, there is a fuel filter behind the brass "bolt" head which faces the rear of the car. On standard bugs, there is a fuel filter built into the tank outlet. The original style was a wire gauze which was enough to stop rust flakes but was notna true filter. These wore gauzes do eventually corrode and can collapse, causing a partial or complete fuel blockage. Plastic replacements are available. On superbugs, there should be a filter "sock" inside the fuel tank over the outlet pipe. These dont seem to ever clog up (probably due to their large size), but an additional fuel filter is still a good addition to the fuel system. Often times poor performance (or NO performance!) can be traced to the fuel filter. Rob had an interesting experience in this regard - When I examined the filter it looked okay, and when I blew backwards though it I had no trouble blowing air through it. But I discovered that the thing was apparently partially blocked - enough that only a trickle of fuel could get through. So giving it a rest allowed what was in the pump to leak through and partly fill the bowl in the carburetor, then as I drove, the trickle was less than the fuel use and eventually the car conked out again. Lesson learned -- When in doubt, replace the filter! It can cause you serious headaches if it gets clogged or even partially clogged. The filter is very inexpensive (your local auto parts store will probably have them) and relatively easy to replace. Many VW owners' place a filter under the car, right at the tank outlet. This is fine, but dont forget it's there and needs replacing occasionally! Another popular spot is in the engine bay. Always place the filter before the pump, not between the pump and the carb. placing it between the pump and the carb has been known to cause engine fires, because the brass inlet in the top of the carb is just a push fit, and the extra weight of the filter vibrating on the rubber fuel line can (and DOES) work that brass inlet loose, spraying fuel all over the place. A toasted bug is not a pretty sight! Placing the filter before the pump also gives it nice clean fuel to work with, so it will last longer.
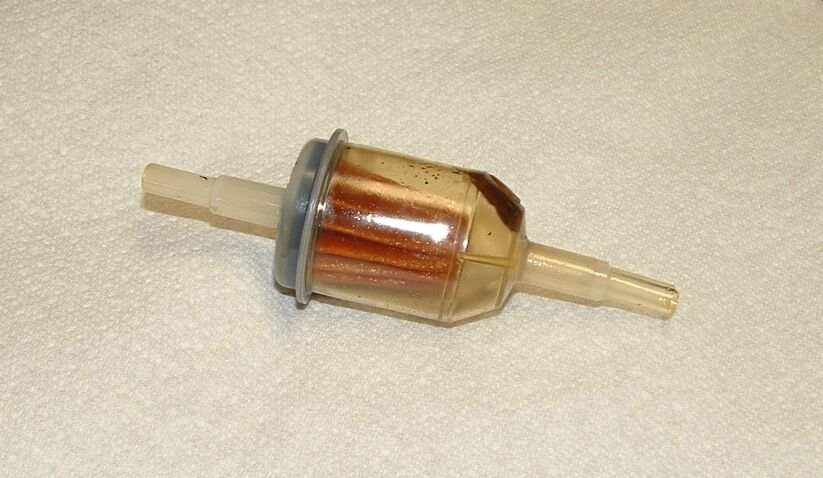 Clogged Fuel Filter
 Clogged and New Fuel FiltersProcedureHeres how to replace the fuel filter located under the fuel tank in the right-front wheel well -
Note: You ARE going to spill some gas - a lot if you're not careful!! Be prepared with a flat metal pan to put under the working area (before you begin work on the fuel filter!), a quart jar to catch gas as you break connections, a couple of sharpened pencils, and lots of rags. Note: Dave has tried various means of clamping the hoses, with only marginal success, lots of frustration, and lots of spilled gas. He has found that the following method is easiest and results in the least amount of gas spillage. Note: You will probably need to built a little pedestal out of 2x4's or something to set the jar on, as the removed line won't extend all the way down to it. There won't be much gas spillage in any event, since with the front of the car raised the fuel line is sloping toward the rear of the car. Note: It is important to attach the line from the fuel tank to the filter as quickly as possible, as there may be up to ten gallons of head behind this line! Note: Note the direction of flow carefully. It's easy to get the hoses mixed up and install the filter backwards. Please note: If you have a filter between the fuel pump and the carburetor, MOVE IT! As stated above, having the extra weight of a filter vibrating on the fuel line up to the carburettor can cause the brass inlet pipe in the top of the carburettor to work loose. If it does it will spray fuel all over the running engine! Any filter in the engine bay should be BEFORE the fuel pump, not between the pump and carburettor. A word or two on the small clear filters most of use use with our bugs. These are mostly positioned vertically or nearly so. They have the outlet pipe well down inside the paper cone, so when the filter is new, the fuel only has to touch the filter paper to get through to the outlet. As the filter starts to clog, the fuel climbs higher to find fresh filter paper. So a new filter always looks part empty, and a FULL filter is telling you it's getting clogged and should be replaced. The same applies if you position the filter on it's side, but when fresh the filter will look about 1/2 full. While you're here, clean the filter screen in the fuel pump (if there is one - usually only on standard Bugs witht the old style upright rectangualr fuel pump), as follows -
|
||
|
|