The Fan
~~~
The following topics related to the VW fan are discussed in this article -
~~~
General Description of the Fan
and Related Components
Paraphrased from John Muir* -
The Volkswagen engine is air-cooled, which means that the heat of combustion in the cylinders and heads is carried away by the flow of air. The cylinders and heads are cast with fins to aid in the removal of heat. A centrifugal blower (usually referred to as a fan) is provided to force air down through the spaces between the fins to carry the heat to the atmosphere. The entire engine is shrouded by sheet metal (usually called the engine tin) to direct the flowing air to the most efficient path. The fan is attached to the front (front is front of car) of the generator or alternator and is driven (along with the generator or alternator) by a belt from the crankshaft pulley. The fan is encased in a fan housing (often referred to as the fan shroud) which is attached to the engine tin to make an air-tight assembly.
The cooling air is drawn from the outside through slots in the car's body under the rear window (and, in later models, through slots in the engine lid as well) by the suction of the fan in the front (front) of the fan shroud. From there the air is blown primarily down through the cylinders and heads, but also (in cold weather) through nozzles on the sides of the fan shroud, through the heater boxes and to the front of the car to provide warmth in the winter.
Also in the fan housing, bolted to the top of the crankcase with appropriate seals, is an oil cooler which stands up in the stream of air like a radiator and cools the oil which is pumped through it. In later models the oil cooler is located just forward of the main body of the fan housing, with separate housing tin molded around it. The fan housing for such models is referred to as a doghouse housing.
*How to Keep Your Volkswagen Alive -- A Manual of Step-by-Step Procedures for the Compleat Idiot, 1976 Edition, page 14.
~~~
Note: Air flow for the non-doghouse 1300/1500/1600cc engines is 21 cubic feet per second at 4000 rpm. The doghouse cooling fan is wider and blows around 25cf/sec @ 4000rpm, which is why cars with this cooling set-up NEED a slotted engine lid - the slots under the rear window are simply not large enough to provide the doghouse fan running with enough air at higher engine speeds.
~~~
The Fan as Part of the Cooling System
Again, don't lose sight of the fact that your Bug is AIRCOOLED. The fan is the prime mover in the car's cooling system, as described above.
We received a question regarding fan size vis-a-vis the dognouse oil cooler (and the capacity of the system as a function of fan size -
Could an earlier non doghouse fan cause an engine to run hotter when installed in a later doghouse shroud? The earlier fan is 32mm and the later fan is 35mm.
Here's Rob's response -
The short answer is yes. The narrow (non-doghouse) fan will leak air all over the place when inside the doghouse shroud as it will have too big a gap around the edge of the fan opening in the shroud.
The fan produces a positive pressure of about 5psi inside the shroud, so any excessive gap at the edge of the fan means the air inside the shroud will leak out the gap, and straight back into the fan, rather than forcing it all down through the engine cooling fins.
And since the oil cooler air supply comes off the fan right at that same edge of the fan opening (a narrow slot on the
opposite side to the doghouse with a duct under the fan opening to take the air across to the doghouse), much less air will be getting to the doghouse and the oil cooler, so the oil (and therefore engine) temperature will be higher than it should be.
Since the thinner fan IS thinner, it will blow less air in the first place. This thinner fan was designed for the 1300 engine and about 44 hp. It worked OK for the 53HP 1500 engine too, but became marginal with the first 1600 (single port) engines with 58hp. VW engineers recognised the problem and introduced the slotted engine lids in 1970 as a stop gap until they had the larger doghouse fan system ready.
In summary -
- Less air than it needs altogether (22cf/sec vs 25cf/sec for the proper doghouse fan).
- Very little cooling air going to the oil cooler.
- A lot of leaking/recirculating cooling air due to the wide gap (about 4mm instead of 1mm) between fan and shroud at
the lip of the fan shroud opening.
Regarding the gap between the rim of the fan and the shroud, Rob wrote -
Put your hand into the fan opening in the front of the fan shroud (engine OFF please!), and see if there is a gap between the rim of the fan, and the shroud. It should be no problem feeling over the top of the shroud above the alternator and feeling the opening lip of the shroud and the fan rim just inside it. There should be only a tiny gap between the two if the fan and alternator attachment plate are correct.
If the fan is the older type there would be a bigger gap as it is narrower than the later type. Since it's a one-minute job it's certainly worth checking. If you have the wrong fan you would be getting LESS cooling air, and losing some of what you are getting.
When you remove the engine, looking at the fan will show instantly if it's the right one and correctly mounted. It should completely fill the fan shroud opening, with almost no gap all the way around between fan rim and shroud (1-2 mm) - enough to get a fingernail between, but not much more than that. A gap of 5mm or more and I'd suspect that the fan was the wrong one (though I think this is highly unlikely).
Dave reported - I checked the clearance between the fan and the housing -- it is indeed five mm. Obviously the PO installed the fan designed for use with the alternator in the '71 housing.
Rob responded - No, it's the other way around, an early thinner fan inside the later wider doghouse shroud, designed for the wider fan. It's obviously working, as you've taken the car on a couple of long trips, but if I am correct, then it will run a little short on cooling in hot weather when under load. The later wider fan pumps out roughly 10% extra air to allow for the separate air path to the offset oil cooler, whilst still maintaining a better airflow and pressure to the heads/cylinders. Since the oil cooler air channels in the shroud are at the front of the shroud (closest to the main air inlet), the oil cooler may be getting less air than it would like.
The older thinner fan and the newer wider one are completely interchanagable on the shaft, but each has its own width of shroud to suit the width of the fan. The doghouse fan probably would not fit in the older shrouds without binding, but the old fan will certainly fit in the newer doghouse shroud, but with a leaky gap around it (and less total air volume too, of course).
~~~
Fan Removal
We received a question about the best way to remove the fan from the alternator -- that is, to loosen the big nut on the forward end of the alternator shaft. Some say an impact wrench is necessary; others say you can put the pulley in a vise (padded with an old drive belt) and then remove the nut with a 1-13/16" socket.
John Connolly (Aircooled.Net) responded - You need an impact driver. Those guys that use a vice are also the ones that have gone throgh five fans in three years. If you don't have an impact driver, take a 6-pack to the local garage. It's a 3-minute job (don't forget a 10mm socket and ratchet to get the backing plates off).
Dave found that the following method worked well -
Take a big block of wood and drill a shallow hole in it just larger than the pulley nut, then place the alternator/fan assembly down on the block, pulley end down, nut in the hole, so that it's resting on the pulley rather than the nut. Then, go after the fan nut on the other end with the impact driver. As long as the pulley is on tight and the shaft is upright so the pressure is even around the rim, you won't damage the pulley. It certainly is easier to strike downwards rather than sideways, and at the same time prevent marking the end of the alternator shaft on a concrete floor.
Rob's method. I found that I could put a thin screwdriver down the slot in the pulley half next to the alternator/generator, which locks the pully from turning (as though you were going to adjust the fan belt tension), and use my 36mm socket with a short extension, and the fan nut came off just fine. It has only 40ftlbs torque, nothing like the amunt of the axle nuts or flywheel gland nut.
Regarding re-installation. When putting the fan nut back on it will be possible to hold the alternator shaft with a wrench on the pulley nut. The torque specification for the fan nut is 40 ft-lbs -- not excessively tight. You have to use the impact driver to remove the nut simply because it's difficult to keep the shaft from turning when trying to remove the nut (counterclockwise). And then too, the nut would tend to freeze over time anyway, so it may take a bigger whack to loosen than the bare 40 ft-lbs.
Anyway, holding the pulley nut with a 19-mm wrench while tightening the fan nut will torque both nuts to 40 ft-lb. Then, of course, once the whole assembly is reinstalled in the car, the pulley nut must be removed to get the fan belt on. (See our Fanbelt Replacement Procedure.
Rob provided some further insight - I think "loading" the pulley end of the shaft by gripping it in a vice would not do it any good at all when the other end is torqued to 40 ft-lbs. I suppose that with an impact driver you'd only need to get someone strong to wrap a towel round the pulley and hold it, whilst the second person gives the impact driver a good whack or two. Inertia of the fan and alternator should make it easy enough to loosen.
When removing the fan from it's shaft, take careful note of the position of the three thin spacer washers. These are used to position the fan along the shaft to minimise the gap at the fan opening. Also take note of the way the wavy-washer is positioned - there is a right and wroiong way for this under the fan nut.
~~~
Fan Cleaning
Dave recorded the following experience regarding fan cleaning - I successfully took my fan/alternator assembly apart, thanks to my new handy-dandy impact driver. Piece of cake. It had obviously never been taken apart before -- it was FILTHY in there! I took the fan assembly all apart and gave all the parts a thorough cleaning, then a fresh coat of paint. Then I installed the fan and associated bits on the beautiful new alternator.
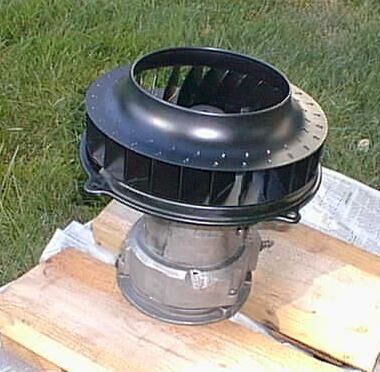 Cleaned and Painted Fan
~~~
Cleaned and Painted Fan
~~~
Fan Replacement
Regarding recommendations that Dave replace the fan, Rob wrote - I'm a little puzzled about the need to replace the fan. It spins to a max of about 8500rpm (4800 engine rpm), and I guess it could be damaged on a stock engine by overrevving the engine, but unless it's causing vibration, I would think it's still okay. Mine's done 248,000 miles without any problems at all. At Rob's suggestion Dave did not replace the fan, and has had no troubles (after initial problems).
~~~
Alternator Vent
There is a vent on the alternator backing plate that attaches to the fan housing. This vent is used to cool the alternator/generator -- it sucks air through the alternator into the fan. So the main cooling fan does the alternator cooling job without the need for those little fans found on the outside of most alternators. On your alternator you'll see some slots just behind the pulley -- this is where the air enters.
Air is drawn through the alternator or generator to cool it. The vent, which is on the edge of the backing plate (inside the fan shroud when assembled), MUST POINT DOWN to cool the alternator. Failure to point this slot downwards can lead to generator/alternator overheating and failure.
~~~
Fan Shroud Alignment
Dave wrote - Regarding the engine tin that sticks up around the base of the fan housing on either side: Not remembering whether the housing goes inside or outside of this vertical tin, I did a little research in the Haynes Manual and found a picture that clearly shows the vertical engine tin on the outside of the fan housing.
While putting on the fan belt I discovered that the fan is rubbing slightly on the inside of the fan housing. It definitely was not rubbing while the assembly was on the workbench -- I don't know why its decided to do so now.
Rob responded - Rubbing on the front or rear of the fan? Did you put the spacers for the fan back in the same location they were before? There are three of them which can go either between the Alt and the fan, or on the other side of the fan under the fastening nut, to move the fan along the shaft to set the clearance with the fan shroud opening. Tension on the fan belt pulling the alternator shaft slightly rearwards perhaps? Slightly possible that you put the belt on too tightly. Remotely possible that you didn't center the fan cover plate exactly right in the shourd, though there isn't much play there -- those holes act as positioning holes for the fan/alternator. One possibility -- you might be able to lift or push the shroud down just a tiny amount on the two outer fixing screws, leaving the fan backing plate firmly bolted. The shroud might be "bending" fractionally, enough to rub.
Dave reported - I took off the piece-of-junk alternator strap I got from XYZ (broken already) and just lifted up a bit on the alternator -- end of the rubbing fan. When held down tightly to the stand, however, it does rub. Strange. I wonder if there is something under the fan housing that is keeping it from seating all the way down, because the alternator won't fit snugly down on the stand -- a "high shroud" problem. And that's exactly what it turned out to be. I just loosened the two side bolts on the shroud and pushed it down firmly, then strapped the alternator in place, tightened up the bolts, and it spins freely!
Rob's note - it's almost alweays something simple when it comes to VW engines - the engineers were great at designing parts which fit together "just right", so if it doesn't go together easily, something it just "not right". My thoughts when working on VW engines is, "look for the simple stuff first and you'll rarely have to look for the tough stuff, because most problems have simple solutions."
~~~
Cooling Vane Connecting rod
When reinstalling the fan shroud Dave had trouble with the cooling vane connecting rod -- the rod that connects the movable flaps inside each side of the shroud and connect via a vertical rod to the thermostat. It wouldn't clear the doghouse oil cooler. Rob wrote - the connecting rod has appropriate bends in it to get around the oil cooler and things. It all has to go together in the proper sequence, but it all fits together very nicely.
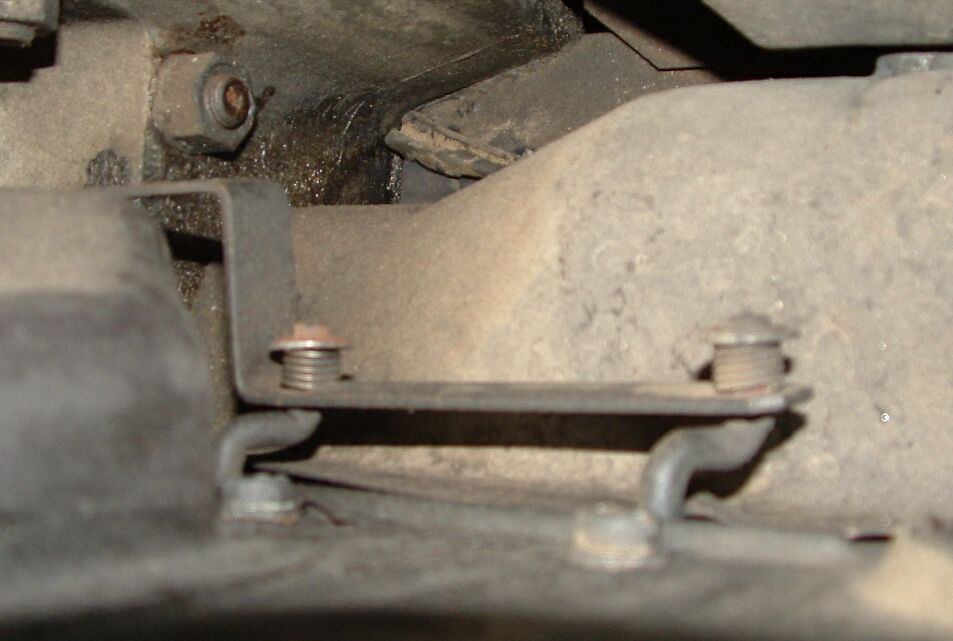 Cooling Vane Connecting rod Attached to the Cooling Vanes
~~~
Cooling Vane Connecting rod Attached to the Cooling Vanes
~~~
Alternator Pedestal
When Dave's son bought his '73 Super Beetle, there was a circumferential crack all the way around the alternator pedestal, through which oil would pour whenever oil was added to the crankcase. Dave went through two "pot-metal" pedestals before resolving this problem. Dave's mechanic said the he had "never heard of a failure like this...never." Rob's mechanic told him that the cheap ones don't last very long. Dave was delighted to find an original VW alternator stand at Russ' Recycling in Duarte, California, and he has had no trouble since.
For further discussion regarding the alternator pedestal, see our article devoted entirely to the Alternator Pedestal.
~~~
Pulley Spacing
Dave encountered a very strange problem with the forward half of the alternator pulley rubbing against the alternator. He found that a spacer of some sort is needed between the front pulley half and the alternator, otherwise the pulley will rub against the alternator as it rotates. Rob was skeptical and said that such a spacer really shouldn't be needed. If it IS needed, the question is why? Incorrect pulley wheel (using a 6-volt one perhaps), or is the pulley distorted? It should be close to, but not rubbing, on the alternator. The various VW catalogues, which have quite clear pictures, do not show any washer between alternator/generator and front pulley half. The pulleys aren't expensive, and perhaps a new one will fix the problem in a flash.
And indeed it did. Dave discovered that not all alternator pulleys are created equal! He went through three, all ostensibly designed for Dave's situation -- but only one had a lip shallow enough to miss the rear part of the alternator while spinning. See our article on the Alternator Pulley.
~~~
Pulley Nut
Dave wrote - Dave had a little trouble with the pulley nut. He tried putting the extra shims under the nut, but then he couldn't get the nut on. Rob reported that he has usually found it a bit difficult to start the nut, as the slack belt tends to fall into the center of the pulley halves. Squeezing the slack fan belt at the sides can sometimesmlift it out of the valley enough to move the outer pulley half and get the nut started. But once the nut is started and tightened a few turns, Rob turns the pulley by using a screw driver in the slots in the front half, and the belt climbs out of the valley to it's proper place so the nut can be tightened. An alternate method would be to just keep turning the nut so it tightens a bit, then pulls the engine around to the next compression (has to be in neutral of course), and the belt climbs higher at the same time, then the nut tightens some more, and so forth. Once the nut is snug, use the screw driver in the slot to hold the pulley while the nut is fully tightened. It's a bit of a fiddle, but not really difficult.
Make sure that the fat pressure washer is immediately under the nut. The genuine article is about 1/8" thick "plain" washer with a slight dish in the middle and flat rim, so the nut presses on the raised dish and applies pressure to the rim of the shim stack. I think it also has a "flat" in the hole so it won't rotate.
Dave had a split washer on his alternator shaft, and he had a very difficult time getting the nut started with the washer on. He could hardly get it started with the washer OFF! Apparently a PO had put in the extra split washer. Such a washer is definitely not needed -- the design of the thrust washer prevents the nut from undoing, and the direction of spin tends to do it up anyway.
~~~
Fan Belt Size/Tightness
Someone wrote wondering whether it is possible to over tighten the fan belt. He said that his deflects less than half an inch, with all the shims inside. The guy couldn't seem to find a belt that fits just right --either too loose or too tight.
Rob responded - Yes, you can have a belt too tight, and this puts extra strain on the generator bearing nearest the fan belt. The correct belt is a 905x9.5mm belt for generator equiped cars (read on). There is a common 900mm size which some folks try to use, and this will sort of fit, but it is usually too tight, even with all the spacer washers between the pulley halves. The other fan belt which works is a 912 x 11.3 belt. When the alternator was introduced, it, together with the higher flow doghouse fan previously introdcued, pout a big load on the fan belt, and the VW engineers decided that a stronger/wider belt was needed. The woder belt rides higher in the fixed engine pulley groove so it needed to be slightly longer. This 912 x 11.3 belt works for all models, whether they have a generator or alternaotr. You can use the older style 905 x 9.5mm belt, but it wont last as long.
Just for information - the older style narrow fan and generator put about 4-5hp load on the fan belt. The wider doghouse fan and the alternator put up to about 6hp load on the fan belt - hence VWs decision to increase the width (strength) of the belt.
Someone wrote that he doesn't put ANY shims between the two pulley halves, as the belt is just right without them. Rob said that seems a little short. It should have at least 3-4 shims for a 905mm belt, and about the same when using a 912mm belt (which rides higher in the ENGINE pulley). Shims are removed from between the pulley halves to tighten the belt as it wears. The Beetle normally comes with about 10 shims altogether, and of course ALL shims should be on the generator axle, either between the pulley halves or under the nut, so the stack remains the same depth and the lock washer and nut fit correctly.
Dave said that the replacement belt he had (and most likely the one that was on the car as well) was 920mm in length. Rob said it would be much better to find a 905mm belt -- with the longer belt you have to make it climb right up to the top of the pulley to get it tight.
"Speedy" Jim wrote to ask - Are you aware that the alternator belt is different from the generator belt? The alternator fan belt is supposed to be 912mm, versus 905mm for the generator. This is because the 912mm alternator belt is 11.3mm wide whereas the 905 generator belt is 10mm wide.
Rob elaborated - That means the longer wider belt will ride higher in the engine pulley groove, but in the same place in the alternator pulley (maybe with an extra shim or two) as the shorter thinner belt, but it will be stronger for the bigger doghouse fan and the higher output alternator.
The fan belt works quite hard for such a thin one and it's been the same from '49 to '72. The 36hp engine had 24 blades on the fan and 160 watt generator. The 40hp and 1300/1500/1600cc single-port engines had 28 blades and during that time the generator output rose from 160 watts to 360 watts. The difference between DIN and SAE hp ratings indicates roughly 4hp on the fan belt on early engines to about 5hp on the 1500/1600cc single-port engines. The doghouse fan is about 10% bigger (it's wider) so will absorb maybe 5.5hp ('71 and '72). Then add 1/3 hp for the extra alternator output (220 watts extra) ('73 up) and you have close to 6hp driven by the belt.
VW found that the thinner belt was breaking more often or wearing too fast on the doghouse/generator models ('71, '72) and so when they introduced the alternator they thought they'd better have a bigger belt. The 912mm belt is about 10% bigger than the old one, and the longer fatter belt would also result in a greater side area to the belt - it's the sides which grab the pulleys. So the bottom line -- the shorter, thinner belt on an alternator will work OK, but it probably won't last as long as otherwise.
Regarding belt tension adjustment -- more shims inside the pulley halves for a shorter (newer) belt, and less shims for a longer (worn) belt. Dave was surprised to find six shims between the pulley halves, which he thought perhaps could be making the gap between the pulley halves too wide and the belt too loose and perhaps slipping. Certainly a loose belt will slip a little - it runs about 5hp through it at high rpm to drive the fan, and that's a lot of load on a small belt, so it needs to be just tight enough, but not so tight it stresses the alternator/generator bearing.
The 905mm belt can't be had for love nor money in Australia - Bosch and the others only supply a 900 x 9.5mm belt, which I have found buries itself so far into the pulleys it almost touches the shims in the generator pulley. The 900mm belt works okay - it just doesn't look quite right. I'm sure I used to be able to buy the 905 x 10mm belts which would sit a little higher in the grooves, but none of the belt distributors or VW shops know of them.
Rob asked John Connolly (Aircooled.Net) - I have a generator Beetle which uses the 900mm or 905mm belt. In Australia, only the 9.5 x 900mm belt is available, but this belt sits VERY low inside the pulleys, almost touching the adjusting shims in my '71 dual-port engine. It just doesn't LOOK right (though it seems to work OK). I note that you have both 900 and 905s, and if I can't find the 905s here in Australia, I think I'll get some from you.
Question - can you confirm that the 10 x 905mm belt is likely to ride a little higher in the pulley grooves than the 9.5 x 900mm belt? And a further question - will the 11.3 x 912mmm alternator belt fit on the generator models too, or is the alternator engine pulley wider to take the wider belt? I've heard both sides - yes it fits; and no it needs the alternator engine pulley. My thought was that if the alternator belt fits the generator models, I'd use the wider stronger belt on my two generator VWs.
John Connolly responded - Yes, run the 11.3 X 912mm instead, it's just the ticket for you.
Rob responded - So there is no difference in the engine pulleys (generator, alternator models), then. I'm pleased to hear it -- I always thought that the thin/short belt was working very hard. It's a wonder it lasts as long as it does.
What John is essentially saying, is that the 11.3 x 912mm belt is applicable to virtually all Bugs. But one VW place in Australia said the alternator Bug engine pulley had a wider groove. Yet 11.3 x 912mm belts are unobtainable in Australia, so the presumption is that they are using the 9.5 x 900mm belts on all Bugs - which would mean a shorter life on a alternator Bug with it's bigger fan and alternator.
Dave installed a new 11.3 x 912mm fan belt on his '73 Super Beetle. With five shims between the pulley halves the belt was just a little tight. Rob recommended adding another. You can go up to 8 -- that's usually how many are in the stack.
~~~
Spare Belt
The only absolutely essential spare you need to carry in any VW (besides the spare tyre and the means to change it) is a spare fan belt. Rob replaces the belt as soon as he sees it starting to crack -- usually about 50,000 miles -- and then keeps that one as the spare, (throwing out the previous used spare which has then been sitting in the front of the car for 3-4 years). He's only needed to use a spare once, but even that once is enough to make keeping it worthwhile. Even a cracked spare is better than no belt!
*
* * * *
|
