|
||

|
|
Door Trim Panel Discussionlearned while running the procedure above. You're faced with removal and reinstallation of the door trim panels. As easy as the guy in the video makes it look, it's NOT an easy job. Removal of the panels is a challenge. Before you can remove the door trim panel you must remove the door handle and the window crank, of course. Then the armrest must be removed by removing two large screws underneath the armrest in the later model cars (at least '73+).That's the easy part. Now to removal of the trim panel inself. If you just go around the edges and start to pull, you will very likely damage the panel, sometimes irrepairably. You've got two things to worry about: 1) damaging the panel, and 2) marring the nice new finish on the door. To remove the trim panel I use a small, flat pry bar (only about 6-inches long) with a thick piece of terry cloth, folded over several times. This piece of cloth is used as padding, and it goes between the pry bar and the metal body of the door interior so not to scratch the paint. The pry point is directly over each panel clip, NOT between the clips. Each clip must be CAREFULLY extracted from the corresponding hole in the door, in which there is (or should be) a rubber insert. Note: The biggest problem I had with removal of the trim panel had to do with the pressed board that the panel is made of (it's actually pressed sawdust! Why couldn't they have used a nice piece of Masonite and be done with it!?) The material between the clip point and the edge of the pressed board will sometimes tear through to the edge. This problem is very difficult to repair, and it makes reinstallation of the trim panel very difficult, because you can't install the clip properly. This may not be an original design problem, but one that arises from the cheap stuff the aftermarket panels are made of.
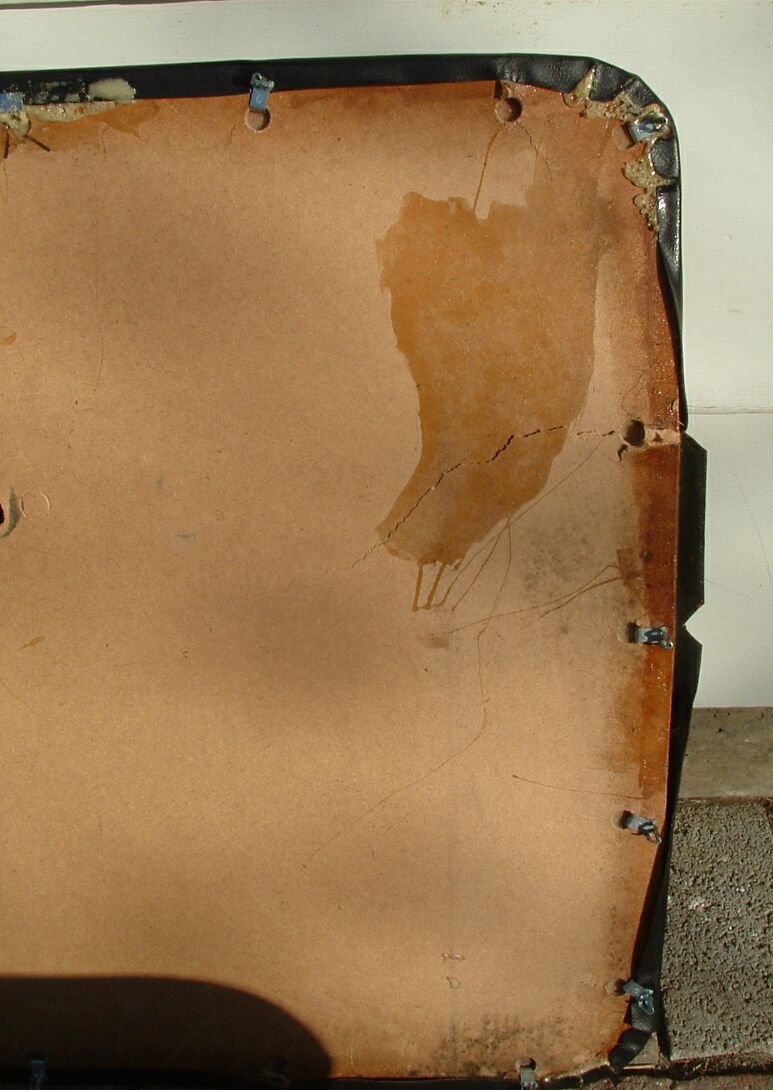 Damaged Door Trim PanelI also had trouble with the vinyl trim that covers the pressed-wood panel interior coming unstuck around the edges -- and this after only about a year since the panels were purchased new. A little judicious application of contact cement, with clothes pins to hold the fabric in place till it dried, solved that little problem -- at least so I thought. After only another year in the car the vinyl trim began to become unstuck around the edges again! So I very carefully removed the door trim panels again and laid them out on a piece of carpet in my garage. I've discovered a product called "Gorilla Glue," which is touted to be the strongest glue in the world. The glue requires 3-4 hours to set up and the vinyl must be clamped tightly against the inside surface of the trim while the glue dries. Wooden spring-type clothes pins work very well for this, but after using them I learned another lesson! The clothes pins left indentations around the outside surface of the trim where they had been placed, which is a bit unsightly. If I ever do this again I will use thin strips of wood (like a yardstick cut to appropriate lengths) under the clothes pins to spread the pressure. The Gorilla Glue worked very well for this purpose, but you must be careful not to use too much, as it bubbles up and expands as it sets. There is supposed to be a plastic sheet stuck to the door frame behind the door trim panel, but its very common for this sheet to be missing. You can often see the line of old glue around the frame where it was held in place. Rob reinstalled this plastic sheet behind the trim panels in his 68 Bug to keep out the wet. Some water always gets into the doors -- the outside rubber is not perfect even when new. I've installed this protective plastic sheeting in my '73 Super Beetle, and generated an Installation Procedure as a result. There is interesting discussion at this link in addition to the procedure. Before reinstalling the trim panels, there are three things you must do (after you've installed the protective plastic sheeting) -
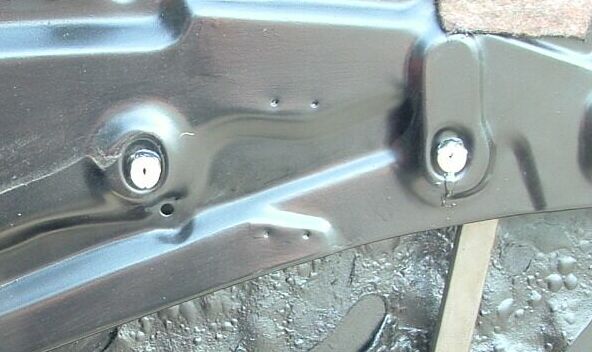
Install the trim panel slowly and carefully. As you go around the panel, MAKE SURE that each clip is properly aligned with the rubber insert in the hole in the door frame before pushing it into place. If the clip is misaligned, and you try to pound the clip into place with your fist or a rubber mallet, you will tear out the clip hole in the trim piece every time. Voice of experience here -- if you tear out the hole (and it's very easy to do!) you've got a very difficult problem on your hands. Note: In an attempt to repair the torn out holes, I glued some thin metal reinforcing strips (cut out of a tin can) along the edge of the panel for the clips to slide over; now with the panels off again I have found that this works very well, except, like the vinyl, the metal strips are coming unglued. Gorilla Glue seems to work better than contact cement for gluing these strips in place as well. Another difficult part of the door trim replacement is reinstallation of the arm rest. On the later model Bug's (at least '73+ on) there are two little white inserts that the reside in two square holes in the door frame (see the picture below). The arm rest screws are supposed to screw into these inserts. The problem is, the inserts have a tendency to fall out, and with the door trim in place that's a bit of a problem (I don't really enjoy removing the door trim panel to fish a little plastic insert out of the bottom of the door frame!).
 Arm Rest Inserts in the Later Model DoorThe older design, in which the arm rest has a bracket behind it which slips over a tongue in the door, was superior. In that design you just bend the trim panel a little and slip the bracket over the tongue in the door frame. Then you just carefully line the clips around the rim up with the holes and pop them in. I solved the problem in my '73 Super Beetle by drilling a hole in the door frame right below the plastic insert, then screwing a long sheet metal screw right into the metal. (You have to just about stand on your head to see the screws!) Good luck! I would welcome any comments, suggestions, war stories, whatever.
|
||
|
|