Accelerator Cable Replacement

Click on this link for further discussion of the Accelerator Cable and related topics.

~~~

This procedure was updated after another broken cable
experience on August 12/13, 2004, and again after a
cable upgrade in November 2007.

~~~

Note: The accelerator cable connects the carburetor (throttle lever) with the accelerator pedal.

The routing of the cable from the accelerator pedal rearward is as follows -

  • From its attachment to the accelerator pedal in the cabin, the cable passes rearward through a metal tube in the floor pan.
  • The cable immerges into the area over the transaxle and enters a flexible guide tube, through which it runs rearward to the firewall.
  • The guide tube has a flared metal fitting on the rearward end. This fitting fits over a metal tube that projects into the engine compartment and goes through the fan shroud.
  • Note: The flexible guide tube containing the accelerator cable runs over the top of the transaxle, inboard of the clutch cable. Working with the flexible guide tube and fitting its flared end over the metal tube projecting forward through the firewall is VERY awkward. The left rear wheel must be removed, and light is essential - and only one arm at a time can be reached into that area. It feels SO good when you finally get it! :-)

  • The accelerator cable passes through the guide tube and through the metal tube running through the fan shroud, rearward to the carburetor, where the barrel clamp (cylindrical metal fitting - see picture below) on the end of the cable attaches to the bottom of the throttle lever.

~~~

Removing the Accelerator Cable

The following procedure for removal replacement of the accelerator cable was adapted from procedures you will find in the various manuals, augmented by our own experience.
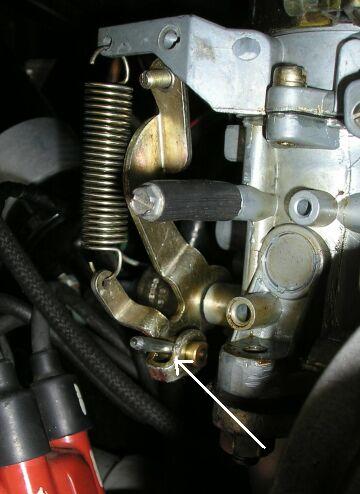
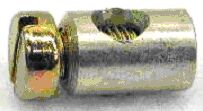
  1. Remove the air cleaner.
  2. Detach the cable from the carburetor by loosening the screw in the barrel clamp in the throttle lever near the base of the carburetor.
  3.  

    Barrel Clamp

    ~~~

    Note: The barrel clamp must be prevented from turning while you loosen the it in. We've had best success with a small vice grip pinching the cable against the bottom of the throttle lever so it can't move while the bolt in the barrel clamp is tightened or loosened.

  4. Remove the cable from the barrel clamp and, if the cable is broken, pull it rearward completely out of the car. Put the barrel clamp aside in a safe place -- you won't be able to reattach the cable if you lose it.
  5. Detach the front cable end from the accelerator pedal.
  6. Block the front wheels. Raise the rear of the car and support it securely on jackstands.
  7. Remove the left rear road wheel for ease of access.
  8. Note: This job is very awkward at best -- it is virtually impossible if the left rear wheel is not removed.

  9. If the cable is still in the car at this point, reach in from the left side of the car over the top of the transaxle. You will find several hoses/cables in this area -- the fuel line, the clutch cable, and the tube containing the accelerator cable. The latter, which we will refer to as the "flexible guide tube," is just about right in the middle, inboard of the clutch cable.
  10. Pull the flexible guide tube forward, which will pull the flared fitting away from the tube that runs through the fan shroud and will pull the cable forward through the firewall. Leave the guide tube dangling, with the cable protruding from the rear end of it.
  11. Move to the front of the car and pull the broken forward end of the cable out of the tube near the accelerator pedal. Wipe it with a cloth as it is coming out to prevent grease from getting on the floor covering.

~~~

Accelerator Cable Installation

First of all, make absolutely sure that your cable is the proper length. Thanks to Aircooled.Net for the following information -

  • '75 - '79 Beetle and Super - 2608mm
  • '72 - '74 Beetle, Super, Ghia and Thing - 2650mm
  • '66 - '71 Beetle, Super and Ghia - 2627mm
  • '58 - '66 Beetle and Ghia - 2650mm
  • '46 - '57 Beetle and Giha - 2650mm

~~~

  1. Start the new cable into the tube just to the rear and slightly inboard of the accelerator pedal. Make sure to have a few rags handy, then lubricate the cable with grease as you push it into the tube (grease your fingers and slide the tube between your fingers as you push it in to the tube).
  2. Push the cable rearward as far as you can get it, greasing it all the way along as you go. Hopefully when you go back to the left rear of the car you will find the rear end of the cable dangling from the rearward end of the flexible guide tube.
  3. Note: If you have removed the flexible guide tube for any reason, at this point you will have to push the cable rearward through the rubber boot and flexible guide tube, then slip the rubber boot and forward end of the guide tube into place. Make sure the cable protrudes from the rear end of the guide tube.

  4. Push the metal tube that runs through the fan shroud into position, making sure that it properly exits the shroud in front (front is front). Then make sure that the tube extends through the hole in the firewall. You will be able to see it right about the top rear of the transmission, protruding through the rubber seal.
  5. Note: It is difficult to see the end of the tube protruding though the firewall -- there's so much stuff in the way (and if you wear bifocals like I do!). It will be above and inboard of the clutch cable. Also, the rubber over the top of the transaxle (especially if it is new) may be in the way and prevent the tube from protruding through. If this is the case, you will have to cut a notch in the rubber with a sharp knife to allow the tube through (easier said than done!).

  6. Guide the accelerator cable into the tube that is protruding through the firewall. Then flex the guide tube forward and place the flared fitting on the end of it over the tube that is projecting through the firewall.
  7. Note: This is quite difficult, considering that the tube through the fan housing is free to move forward-to-back. If you don't have an assistant to hold this tube in place, fashion a piece of wood to place between it and something else in the engine compartment to keep the tube from moving rearward while you install the flared fitting on the end of the flexible guide tube over the fan housing tube. We placed a little block of wood between the end of the tube, against the fan housing wall, pinned against the vacuum nozzle on the intake manifold.

  8. Working in the engine compartment, pull the cable through the fan housing tube into the engine compartment.
  9. Move once again to the cabin and reconnect the front fitting on the cable to the accelerator pedal. There are two types of fittings on the front end of the accelerator cable:
    • The stock S-shaped fitting, which is inserted through the hole in the pedal lever from the side toward the brake pedal.
    • Note: If you hook up the S-shaped fitting the other way (i.e., inserted through the hole from the side opposite the brake pedal), it will come apart the first time you put your foot to the accelerator pedal.


    Wrong way...

    Right way.

    ~~~

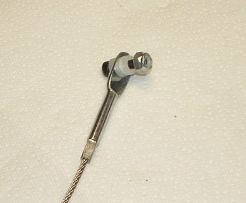
    Note:There is a significantly improved cable ("bulletproof") available from Aircooled.Net. This cable incorporates a flat-paddle design for attachment to the accelerator pedal (see the picture below). The paddle simply bolts to the pedal connection(loosely), with nylon washers and a Nyloc nut - tight without being tight).
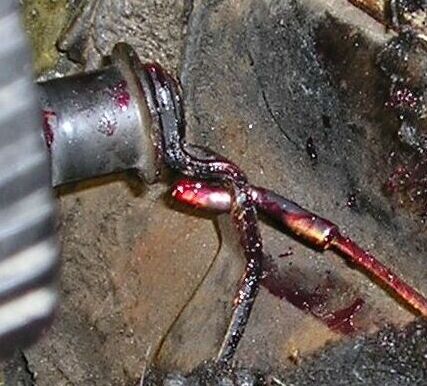


    BugPack Cable Connection

    ~~~

  10. Using the barrel clamp, loosely connect the accelerator cable to the bottom of the throttle lever(see the picture below).
  11. Note: The only drawback we see to the stouter "bulletproof" cable is its lack of a solid metal end connector as on the stock cable. Without this, the barrel clamp screws down directly onto the cable, creating a tendency for it to become mangled over time, especially if the carburetor is repeatedly removed. This problem can be overcome through the use of a throttle cable extension kit available from Bugpack.

    CAUTION: Make absolutely sure that the barrel clamp rotates freely in its two holes at the base of the throttle lever. If it doesn't, it will hang up and cause the accelerator lever to stick, usually at a high rpm. You may be tempted to tap it into place with a hammer, but don't do it! If it's that tight, it won't rotate as the accelerator cable is pulled back and forth, and it will stick. Take the barrel clamp out and polish it with emery cloth until it rotates freely in the holes as the base of the throttle lever.

  12. Have an assistant fully depress the accelerator pedal (or use a couple of heavy bricks to do it) while you adjust the cable. With the pedal fully depressed and the cable extended forward, the throttle lever should be wide open and attached to the cable such that there is about 1mm of clearance between the throttle lever and the point where it impinges on the body of the carburetor. Again, we found a small vice grip necessary to hold the barrel clamp and cable in place while tightening the bolt in the barrel clamp.
  13. Note:The throttle arm should move almost 90 degrees from closed to fully open - when closed it sits almost (not quite) horizontal across the carburetor throat and when fully open it stands vertically in the throat. So if you're getting more movement by pulling on the throttle arm (than the accelerator pedal provides) then the cable is not properly adjusted.

    Note: The Bugpack cable is very long and must be cut to length. Making sure the choke is open, cut the cable, leaving about one-ince extra after the barrel clamp. It is recommended that the cable end be soldered to prevent the cable from unraveling.

    Dave uses a throttle cable extender, which attaches to the cable and then goes through the barrel clamp. The screw in the barrel clamp tightens down on the cable extender instead of the cable. Great look, too!
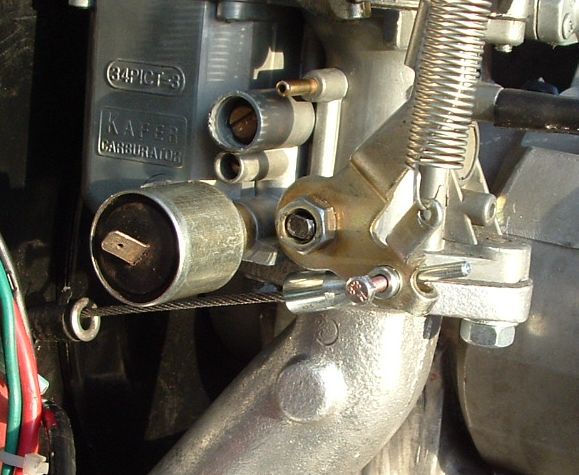
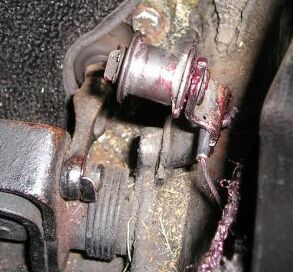
     

    Throttle Cable Extender

    Note: Rob just pulls the accelerator cable back finger tight (NOT with any kind of tool) and then secures it in place with the barrel clamp, and it works just fine. Here are some details on how that's done -

    • Remove the throttle arm spring to provide clearance.
    • Secure the idle screw on the top of the throttle arm to the lowest step on the cam (Dave uses a cable tie).
    • Pull the cable through the barrel clamp until it's tight (don't use a tool - your strong pull is all you need.
    • With the throttle lever in the idle position (against the lowest step on the cam), hold the cable tightly and tighten the barrel clamp screw securely with an 8mm socket.
    • Replace the throttle arm spring.
    • Way easy!


    Properly Connected Accelerated Cable

    ~~~

  14. Reinstall the air cleaner and all of its various hoses.
  15. Test drive the car to make sure the accelerator cable is functioning properly.
  16. Now you may find it necessary to re-tune the carburetor, particularly the idle speed. (See our idle procedure). And with the idle speed adjusted correctly, it may be necessary to adjust the timing.

* * * * *


Design by Erin