|
||

|
|
Solex 30 PICT/2 Carburetor Adjustment Proceduresseries carburettors having a single adjusting screw on the side of the carburettor. Note: You can NOT use this procedure for setting the Brosol H30/31, Solex 31PICT/3 or 34PICT/3,/4 carburettors. Those carburettors use a different adjustment technique altogether. For those you must use the other tune up procedure on this site. - Note: Before you begin to adjust the carburetor, the valves, points, and timing should be set. This is important, and they should be set in the order given below -- start with the engine cold, and finish with it warm. These topics are addressed in the following -
Setting the Valves
The engine must be completely cold to set the valves. 0.004 inches is the factory setting for pre-1971 engines. Some folks find that results in the valves being too tight when the engine warms up, and use 0.006 inches. Note: 1971 and up engines use 0.006 inches. The aim of the tappet setting is to provide virtually no gap when the engine is at operating temperature.
Setting the Points
Now set the points at 0.016 inches. If they are pitted or damaged, or if the rubbing block is badly worn, replace them. Put a small dab of grease on the cam lobes whilst you are at it. Also pull off the rotor arm and have a look at the spindle it sits on. If there is a felt pad in there (some have it, some don't), put a few drops of oil (engine oil is fine) on the pad to help lubricate the distributor. Don't overdo it - just a few drops.
Setting the Timing
The usual timing is as follows: 1200cc with single vacuum distributor - 10BTDC (Before Top Dead Center). This is set with the engine off (static timing). 1300/1500/1600cc with single vacuum distributor - 7.5BTDC. This is set with the engine off (static timing). In the USA, the 67-69 1500 engines used O degrees advance - TDC, with the single vacuum single advance distributor, as an early emissions control measure. 1300/1600cc with double vacuum distributor - 5ATDC (After Top Dead Center). This is set with the engine idling, so that the retard vacuum line is operating. These engines originally used a 31PICT/3 (1300) or 34PICT/3 (1600) carburettor which come with at least two vacuum ports, so it would be unlikely to see a double vacuum distributor on a vehicle equiped with a 30PICT/2 or earlier carburettor, as these have only one vacuum point on them; so this last paragragh is included just to point out the difference in the double vacuum set-up. It is conceivable to use a double vacuum distributor with the retard vacuum line disabled, (then using the 7.5BTDC setting), but the advance curve of this distributor may not suit the earlier carburettor/engine set-up. Note: ALL, repeat ALL VW aircooled engines using the Bosch 009 or other centrifugal advance distributor must be set at 28-32 BTDC at 3000+rpm. It is important to set the 009 at the maximum advance point - the total advance varies on them, and the maximum advance is more important than the idle, which usually ends up somewhere in the 5-10 BTDC range. Use as much of the 28-32 degrees as the engine can take without detonating/pinging, but never use less than 28 degrees - if the engine still detonates/pings ay 28 degrees, use a higher octane fuel and advance the timing to 30 or 32 degrees if possible. It is very common to see the 009 distributor being used as a replacement for the original vacuum distributors (which can be hard to find), but you should note that the 009 was originally designed to work with industrial VW engines running compressors, generators and the like, which were relatively constant speed engines. They were not developed for road going engines with their constant changes in load and rpm, and they were never used on beetles by VW. They do work, but not as well as the appropriate vacuum distributor - often leading to flat spots on acceleration, and a lack of 'pick-up'. Because they have a lower maximum advance amount compared to vacuum distributors (which can provide up to 40-42 degrees advance under the right conditions), 009s will result in slightly increased fuel consumption.
Checking the Choke
Now warm the engine up, take the aircleaner off the top of the carby (if it's the oil filled kind be careful, you don't need a shoe full of oil) and check that the choke butterfly is standing vertical. If it isn't, run the engine some more to make sure it's throughly warm, and check the choke butterfly again. If it is not standing vertical, the butterfly needs adjusting or fixing (another topic). It's important to set the valves, points timing and check the choke before setting the carburettor, they all work together for a smooth running engine.
Adjusting the Carburettor
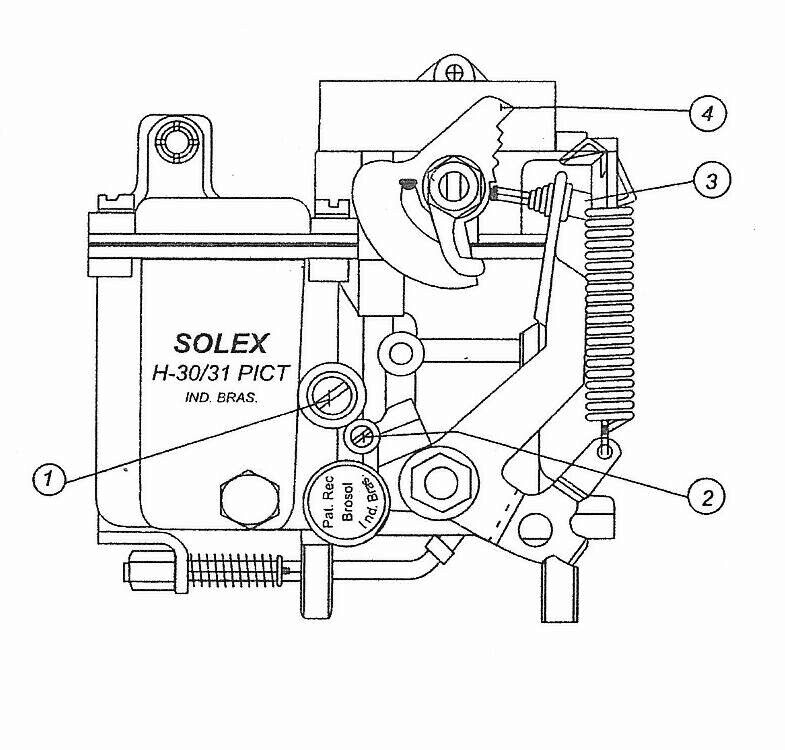 The Brosol 30/31 CarburetorThere is a lever on the left side (left is left side of car) with a cable connected to it. This is the Throttle Lever. On the throttle lever is a small screw which sticks out towards the back of the car. This is the Idle Adjustment Screw. The Idle Adjustment Screw rests on a strange-looking flat piece of metal with steps cut in it. This is the Fast Idle Cam, and works with the choke to give a reliable idle on a cold engine. The engine must be warm to set the carby, so that the choke is off, and the Idle Adjustment Screw is sitting at the bottom of these steps (at the BOTTOM, not on any of the steps themselves). Directly beneath the fast idle cam on the left side of the carburetor you will see a small diameter screw with a spring wrapped around it. This is the Volume Control Screw which is used to adjust the idle mixture. On the right side of the carburetor body is a barrel-shaped object, about the size of a pen-light battery, with a wire connected to the outer end. This is the Idle Fuel Cutoff Valve (solenoid). This shuts of the fuel when you turn off the engine, to prevent 'running on'. Be sure the wire is connected and runs to the (+) terminal on the coil. (This usually runs off the same wire which attaches to the choke.) Also make sure that this solenoid is screwed into the carby snuggly, and not rattling loose. Don't overtighten it though, it's got a fine brass thread and screws into aluminium - both quite soft metals. You can test the operation of this solenoid very easily. Turn on the ignition, and pull off the wire on the valve. Touch the wire on the connector, and you should hear a clicking sound as the valve inside moves. If not, check for 12 volts on the wire (small trouble light, voltmeter etc), and replace the solenoid if required - if it's not working, you won't get a proper idle, and you'll get rough running at traffic speeds too. As stated previously, make sure your engine is warm and the choke butterfly standing upright. Make sure the air cleaner is ON when adjusting the carburettor--the engine expects it to be there.
That's it - you're done. It should be purring like a kitten now. -
Rob Boardman
|
|